Shrinky Dinks Ultimate Guide: How to Make, Bake, and Create
Everything you need to know to master Shrinky Dinks: supplies, instructions, tips, and creative project ideas for all skill levels.
Shrinky Dinks Ultimate Guide
Shrinky Dinks—sometimes called shrink plastic—are a beloved craft material that transforms from flexible plastic sheets to miniaturized, durable pieces of art when heated. Whether you want to make jewelry, keychains, pins, ornaments, or custom art, Shrinky Dinks offer an accessible, fun, and nostalgic project for all ages. This comprehensive guide covers everything you need to know to get started: the best papers and supplies, step-by-step instructions, top tips, troubleshooting advice, and creative inspiration.
Table of Contents
- What Are Shrinky Dinks?
- Supplies and Materials
- Using Recycled Plastic for Shrinky Dinks
- How to Make Shrinky Dinks: Step-by-Step
- Drawing and Decorating Designs
- Cutting Shrinky Dinks
- Baking Shrinky Dinks
- Top Tips and Tricks
- Troubleshooting Common Problems
- Creative Project Ideas
- Frequently Asked Questions
What Are Shrinky Dinks?
Shrinky Dinks are sheets of thin, flexible plastic that shrink and become thicker when baked in a standard home oven. The resulting shrunken pieces are roughly one-third of their original size and can be used to create a wide range of customized crafts, such as jewelry, keychains, ornaments, magnets, and more. First popularized as a children’s craft in the 1980s, Shrinky Dinks remain a favorite for makers, artists, and families due to their simplicity and transformative magic.
Supplies and Materials
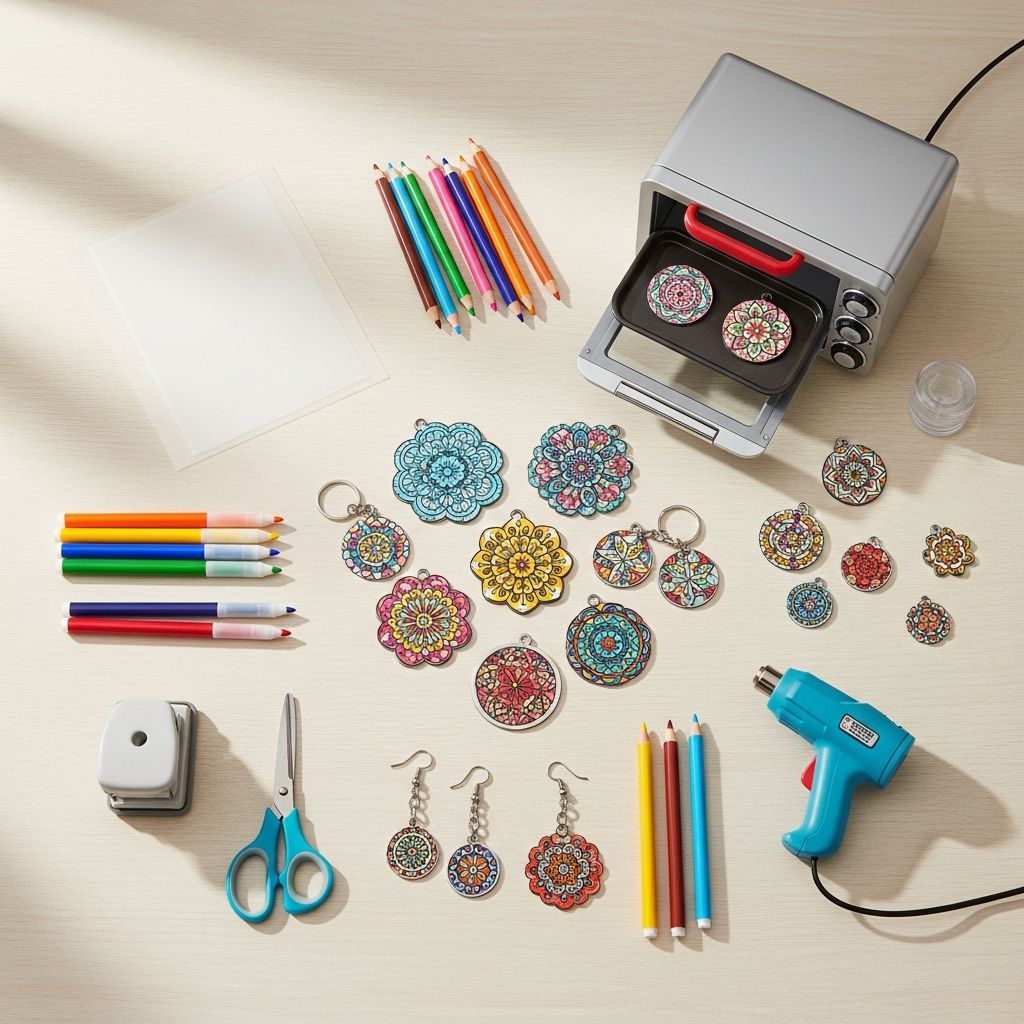
To begin your Shrinky Dinks project, you’ll need some essential supplies. You can use Shrinky Dinks brand shrink plastic or opt for alternatives such as #6 recycled plastics (often found in disposable takeout containers). Depending on your design and decoration preferences, you may want to use colored pencils, permanent markers, or acrylic paint. Here’s what you’ll need:
- Shrinky Dinks sheets or shrink plastic (clear, frosted, white, or pre-sanded for drawing)
- Scissors or precision craft knife (like an X-Acto blade)
- Oven or toaster oven
- Baking tray and parchment paper or heavy cardstock
- Permanent markers (Sharpies are popular) for bolder colors
- Colored pencils (work best on sanded or matte plastic)
- Hole punch (for keychains, jewelry, or ornaments)
- Optional: Decorative scissors, corner rounders, paper punches, acrylic paints, paintbrushes
Best Brands and Varieties
- Shrinky Dinks “Ruff ‘n Ready” Sheets: Pre-sanded for easy coloring with pencils or markers.
- Shrinky Dinks “Bright White,” “Crystal Clear,” and “Frosted Ruff n’ Ready”: For different effects and surface finishes.
- Printable Shrink Film: Special versions can be run through inkjet printers for custom graphics and artwork.
Using Recycled Plastic for Shrinky Dinks
Did you know you can make your own Shrinky Dinks using post-consumer #6 plastic (polystyrene)? Look for the #6 recycling symbol, usually found on clear takeout containers and deli lids. To prep recycled plastic:
- Wash thoroughly with soap and water, then dry completely.
- Use permanent markers for best results (colored pencils won’t work as well on smooth plastic).
- Test a small piece to check for shrinking and coloring before making a full project.
Recycled #6 plastic will shrink just like commercial shrink film—usually about 60% smaller and much thicker!
How to Make Shrinky Dinks: Step-by-Step
Ready to start crafting? Follow these steps to create perfect Shrinky Dinks every time:
- Draw or trace your design on the plastic sheet or on a plain piece of paper to use as a template under a clear sheet.
- Color in your artwork using permanent markers, colored pencils (for rough/frosted sheets), or acrylic paints.
- Cut out your shapes with scissors or a craft knife. For charms, use a hole punch to create holes before baking.
- Arrange pieces on a lined baking tray, making sure they do not touch.
- Bake in a preheated oven according to instructions (see next sections for temperature/time details).
- Allow to cool before handling or assembling into your final project.
Drawing and Decorating Designs
The creative possibilities are nearly endless! Here are guiding tips for decorating Shrinky Dinks:
- Use colored pencils for vibrant color and detail (best on sanded or rough plastic).
- Choose permanent markers (like Sharpies) for bold, opaque lines and quick drying.
- Try acrylic paint for fine art effects—but use thin, even coats and allow each layer to dry.
- Avoid water-based pens, as the color may smudge or disappear when shrinking.
- Consider stamping or tracing designs, then coloring them in for added detail.
- Test your drawing medium on a scrap piece before committing to a big design.
Cutting Shrinky Dinks
After designing and decorating, the next crucial step is cutting out your shapes. Follow these tips for best results:
- Use sharp scissors for simple shapes and broad cuts.
- Try a precision craft knife (like an X-Acto blade) for tight corners or intricate designs.
- Consider specialty punches for circles and fun edges (wavy, scalloped, etc.).
- If making jewelry, punch holes before baking—it’s very difficult to punch through thickened plastic after it shrinks.
- Keep scraps for tiny DIY embellishments or for practice.
Baking Shrinky Dinks
Oven baking is where the magic happens! The shrinking process is quick and mesmerizing, reducing your plastic shape to about one-third original size. Here’s how to do it safely and effectively:
- Preheat your oven: 320–350°F (160–175°C) works well. Toaster ovens offer the most visibility, but a kitchen oven is also fine.
- Prepare your tray: Place shapes on parchment paper, a silicone mat, or heavy cardstock to prevent sticking and keep plastic flat.
- Space pieces apart: Make sure they do not touch; they’ll shrink and thicken rapidly.
- Cover with a second sheet of parchment or cardstock for extra-flat results and to prevent edges from curling up.
- Bake for 2.5–4 minutes. Pieces will curl up, then flatten as they finish shrinking. Remove after the flattening phase; overbaking may discolor or warp your art.
- Flatten if needed: Immediately after removing from the oven, use a spatula or another flat object to press down and ensure your piece lies flat.
Baking Time and Temperature Chart
| Plastic Type | Temperature (°F) | Baking Time |
|---|---|---|
| Shrinky Dinks sheets | 320–350 | 2.5–4 min |
| Recycled #6 plastic | 325–350 | 2.5–3.5 min |
Monitor closely—the transformation only takes a few minutes!
Top Tips and Tricks
- Test before you start: Make a ‘cheat sheet’ from a small scrap to see how much the plastic shrinks and how colors appear after baking.
- Make holes larger than needed: Holes shrink, too! Start with at least a standard 1/4-inch hole punch.
- Round corners and smooth edges: Sharp points can become brittle when thickened; sanding edges after cutting minimizes cracks.
- Weigh down with parchment: Placing a second sheet on top reduces curling and keeps shapes evenly flat.
- Use an oven thermometer: Oven temperatures vary—a thermometer ensures consistent results.
- Seal with resin or spray: For extra durability and a glossy finish, coat finished Shrinky Dinks with doming resin or clear acrylic sealer. Always use these in a well-ventilated area.
Troubleshooting Common Problems
- Curled or warped pieces? Try placing a flat, heat-safe object (like a ceramic tile) over shapes while cooling, or reheat briefly and use a spatula to flatten.
- Cloudy or uneven color? Colored pencils need a rough surface—use pre-sanded sheets or gently sand smooth plastics before coloring.
- Holes too small for jewelry? Start with a larger hole pre-baking; holes shrink by roughly two-thirds.
- Pieces sticking together? Ensure adequate spacing on the baking tray and avoid overlapping shapes.
- Plastic not shrinking? Double-check that you’re using #6 plastic or official Shrinky Dinks sheets—types #1, #2, or #5 will not work.
Creative Project Ideas
Once you’ve mastered the basics, try expanding your projects! Here are some inspiring ways to use Shrinky Dinks:
- Custom keychains: Draw a tiny version of a favorite pet or character and attach a jump ring for a fun key fob.
- Jewelry: Make earrings, necklaces, or brooches—try layering pieces or adding resin gloss for a professional finish.
- Personalized charms: Great for friendship bracelets, bag tags, or holiday ornaments.
- Magnets: Glue magnets to the back for fridge art or whiteboard decor.
- Miniature art: Create expressive tiny portraits or comic panels for a unique gift.
- Decorative pins and buttons: Add pin-backs for instant flair on jackets, bags, or hats.
Frequently Asked Questions (FAQs)
How much do Shrinky Dinks shrink?
Most shrink plastic reduces to about 1/3 of its original size in height and width, or about 60–65% smaller in area. Plan your designs big enough to account for this dramatic reduction.
What temperature is best for baking Shrinky Dinks?
Typically, 320–350°F (160–175°C) is best. Follow the specific instructions of your plastic, and always preheat your oven for optimal results.
Can you use regular colored pencils and markers?
Yes—for colored pencils, use sheets labeled “Ruff n’ Ready” (sanded). For smooth plastics, permanent markers work best.
Can I use recycled plastic instead of commercial shrink plastic?
Yes! Many clear #6 plastics from food containers shrink just like Shrinky Dinks sheets when baked. Clean thoroughly and test for compatibility before starting a full project.
How do I stop Shrinky Dinks from curling?
Placing a second piece of parchment on top while baking and weighing down with a flat item immediately afterward are the best solutions. Most pieces flatten out towards the end of baking.
What’s the best way to add shine or protect the surface?
After cooling, seal with clear acrylic spray, a layer of Mod Podge, or doming resin for a glossy, hard finish that protects colors and adds durability.
Is Shrinky Dink plastic safe?
When used according to instructions and not overheated, it is considered safe. Always ventilate your kitchen and avoid burning the plastic.
Final Tips
- Experiment! Try different art supplies and surfaces to discover unique effects.
- Supervise children during oven use—adults should handle baking and hot plastic.
- Always test first, especially with recycled plastics or new brands of shrink film.
Shrinky Dinks turn any creative idea into a sturdy, colorful miniature masterpiece. Whether you’re rekindling childhood nostalgia or discovering shrink plastic for the first time, use this guide as your go-to resource for successful and imaginative crafting!
References
- https://www.instructables.com/The-Ultimate-Shrinky-Dink-Guide-InkJet-Version/
- https://www.youtube.com/watch?v=snTGW89oONs
- https://chaoticallyyours.com/diy-shrinky-dinks/
- https://www.youtube.com/watch?v=sfebdWGR-fg
- https://abeautifulmess.com/shrinky-dinks-ultimate-guide/
- https://craftpixal.com/shrinky-dinks-ultimate-guide/
- https://jennifermaker.com/diy-shrinky-dinks/
- https://something2offer.com/ultimate-guide-craft-materials-shrinky-dinks/
- https://www.instructables.com/Shrinky-Dinks-and-Doming-Resin/


