How to Make a Sandcastle Cake: Step-by-Step Decorating Guide
Master a stunning sandcastle cake with easy decorating techniques and insider baking tips for unforgettable celebrations.
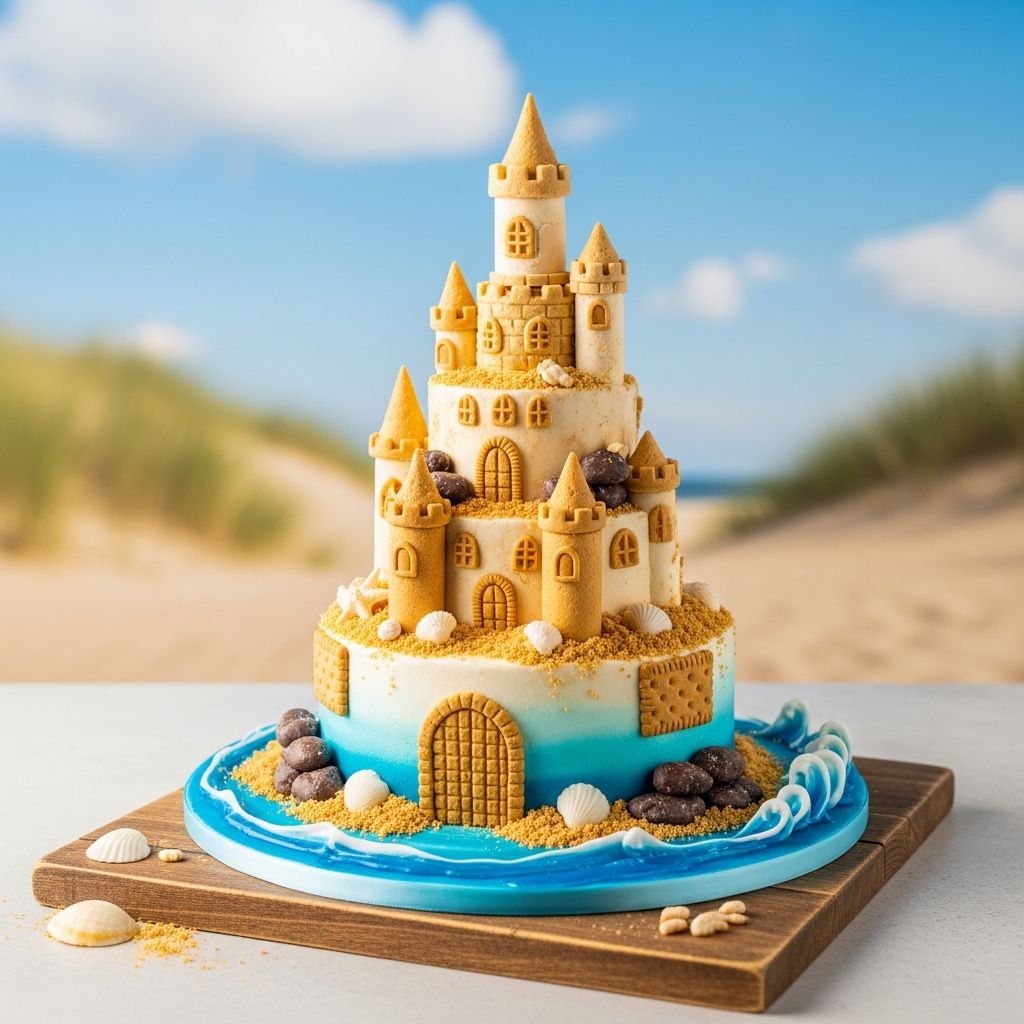
How to Make a Sandcastle Cake
If you’re searching for the ultimate centerpiece for a mermaid or beach-themed birthday party, nothing rivals the charm and whimsy of a sandcastle cake. This delightful creation transforms classic cake layers, vanilla wafers, buttercream, and fondant into a magical edible castle. Whether you’re a seasoned baker or trying your hand at themed cakes for the first time, this step-by-step guide will walk you through every phase of assembly, from prepping the edible sand to the final shell decorations. Gather your ingredients, set aside a few short baking sessions, and get ready to wow your guests with a cake they’ll remember long after the last crumb is gone.
Table of Contents
- Project Overview
- Making Edible Sand
- Buttercream Frosting Recipe
- Sandcastle Cake Assembly Guide
- Making and Applying Fondant Decorations
- Finishing Touches and Tips
- Frequently Asked Questions
Project Overview
Skill Level: Intermediate
Sessions Needed: Three (not full days — just sessions to break up the workload)
- Day 1: Bake and crumb-coat cake layers.
- Day 2: Prep and shape fondant decorations; assemble cake sections.
- Day 3: Decorate with “sand,” add finishing touches, and assemble the full castle for the party.
By dividing the work, you’ll keep the process stress-free and ensure your finished cake is cool, firm, and easy to decorate.
Making Edible Sand for the Cake
The authentic look of a sandcastle cake begins with the “sand” effect. This edible sand is easy to make and doubles as a crisp, sweet topping.
Ingredients for Edible Sand
- 1 box vanilla wafers (or graham crackers)
Instructions
- Crush the wafers: Place the cookies in a food processor and pulse until you have fine crumbs resembling sand.
If you don’t have a food processor, place them in a zip-top bag and crush with a rolling pin. - Set aside: Keep the cookie crumbs in a bowl until you’re ready for the final decorating step.
This edible sand is pressed onto the buttercream and used to coat fondant decorations for a realistic finish.
Buttercream Frosting Recipe
This simple buttercream is colored a sandy beige for authenticity and acts as the edible “glue” for your sand and fondant elements.
Buttercream Ingredients
- 1 cup (2 sticks) butter, at room temperature
- 3 cups powdered sugar
- 1 teaspoon vanilla extract
- 3 tablespoons heavy cream
- (Optional) A few drops of brown gel food coloring
Instructions
- Cream the butter: In a large mixing bowl, beat the butter until light and fluffy.
- Add powdered sugar: Gradually mix in powdered sugar, 1 cup at a time.
- Add flavorings: Beat in the vanilla and cream until smooth. Tint with a touch of brown food coloring to resemble sand, if desired.
Buttercream stores well and can be made in advance and refrigerated until you’re ready to assemble your cake layers.
Sandcastle Cake Assembly Guide
Building a sandcastle cake is all about structure and layering. Here’s how to assemble and stack your components for a sturdy, picture-perfect result.
Step-by-Step Assembly
- Level and Crumb-Coat Cakes:
– Use serrated knives to level your cakes if needed.
– Apply a thin layer of buttercream (crumb coat) to seal in crumbs.
– Chill the cakes to set the crumb coat (at least 1 hour). - Apply Sand-Colored Buttercream:
– Coat each layer with a thicker, smooth layer of buttercream.
– Don’t worry about perfection — the “sand” will cover any uneven spots. - Press on Sand:
– With freshly frosted cakes, gently press the crushed cookie “sand” onto sides and tops using clean hands. – Aim to cover every visible surface; excess crumbs can be brushed away after chilling. - Chill and Prepare for Stacking:
– Place the sand-coated layers in the refrigerator to firm up. – Place the smaller top layer (e.g., 6”) on a matching cardboard round for support. - Stack Layers with Support:
– Insert four food-safe dowels into the bottom cake (e.g., 8” round).
– Carefully lift and stack the smaller cake layer on top, resting on its cardboard base and dowels for structural support. - Add Decorative Towers:
– Create four tall corner towers using cardboard paper towel tubes or wrapped PVC pipes. (Wrap with plastic or parchment before decorating, as these are not edible.)
– Coat surfaces with buttercream and roll in cookie sand for a cohesive look.
– Position at each cake corner, gently pressing them into the buttercream for stability.
Tip: Don’t rush stacking or decorating. Keeping surfaces chilled between steps ensures clean lines and prevents sagging.
Making and Applying Fondant Decorations
Fondant shapes like crenellations, shells, and castle doors contribute playful, realistic detail to your edible castle. You’ll make these pieces ahead of the final assembly day so they can firm up overnight and are easy to handle.
Fondant Steps
- Sculpt Crenellations and Shapes:
- Roll beige or pale yellow fondant into long strips and cut into rectangles or semi-circular shapes for castle parapets/roof trims (“crenellations”).
- Shape fondant into small seashells or create molds for realistic texture.
- For towers, roll fondant flat, then wrap around pre-cut cardstock or cones to form pointed tops.
- Create Fondant Cones:
- Tape cardstock templates into cone shapes for turrets.
- Cover cones with a thin fondant sheet and gently blend the seams.
- Prepare Fondant for Decorating:
- Brush all fondant surfaces lightly with vodka (or minimal water) to ensure crumbs adhere.
- Quickly press cookie crumbs onto moistened fondant for texture.
- Let pieces dry and firm before adding to the cake.
Applying Fondant Decorations to the Cake
- Position Crenellations: Using leftover buttercream as glue, affix trimmed fondant strips around the top edges of your cake tiers. Ensure each piece fits flush, using enough frosting to prevent the fondant from sliding off.
- Add Shells and Doors: Pipe or press on fondant sea shells and a hand-shaped door at the front of the castle for personality and detail.
- Finish with Sand: Sprinkle extra cookie sand over all exposed buttercream and fondant bases for consistency.
Finishing Touches and Additional Tips
- Use alcohol-based brushing when applying edible sand to fondant—vodka evaporates quickly, keeping decorations crisp and preventing sogginess.
- Wait until the event day to finish decorating the cake with sand and shells so everything is as fresh as possible.
- Be creative: Food-safe figurines, extra shells, flags, or even small edible pearls can add extra dimension and fun to your sandcastle scene.
- Chill frequently: Keeping the cake cold between steps helps layers firm up and supports stacking without slippage.
- Make elements ahead: Any fondant shapes and non-edible decorations can be crafted several days early and stored in airtight containers.
Decorating Inspiration
Personalize your sandcastle by experimenting with colored fondant, edible glitter, or using ice cream cones for turrets. Integrate cornstarch or powdered sugar on hands and work surfaces to prevent sticking when shaping fondant. The result is limited only by your imagination!
Frequently Asked Questions (FAQs)
Q: Can I make the cake ahead of time?
A: Yes! Bake and crumb-coat your cakes up to two days ahead. Full assembly and final decorating are best done the day before or the day of your event to retain freshness.
Q: What type of cake works best for a sandcastle cake?
A: Vanilla or butter cakes provide the best structure for stacking and decorating, but chocolate or other flavors work if they’re sturdy. Avoid very soft or crumbly cakes for ease of assembly.
Q: How do I make the decorations stick?
A: Use fresh buttercream frosting as edible glue and/or lightly brush fondant with vodka or water before pressing on crumbs or attaching shapes to the cake.
Q: Can I make the towers entirely edible?
A: Yes, but it’s labor-intensive. Use thickly rolled fondant or stack mini cakes/wafers for towers, but for easiest assembly and stability, use covered non-edible forms.
Q: What tools are required for this cake?
A: Rolling pin, cake pans, food processor (for crumbs), piping bags/spatulas, cardboard rounds, dowels, and an offset spatula are the basics. Edible gel color, fondant tools, and shaping molds are optional for advanced details.
Conclusion
Baking a sandcastle cake is a rewarding creative project, perfect for birthday parties, beach celebrations, or any gathering where you want to impress. With strategic prep, careful chilling, and imaginative decoration, you’ll be able to bring the seaside magic to your dessert table and delight guests of all ages.


