How to Make a Bloomin’ Onion at Home: Comprehensive Guide
Master the art of making a crispy, perfectly golden bloomin' onion right in your own kitchen with this in-depth guide.

Bloomin’ Onion: The Ultimate At-Home Appetizer
The bloomin’ onion is a spectacular appetizer known for its dramatic presentation and irresistible crunch. This guide will walk you through every step to create a restaurant-quality bloomin’ onion at home—from choosing the right onion and mastering the signature cut, to achieving a perfectly crispy, golden crust and serving with the ideal dipping sauce. Whether you’re planning to impress at your next gathering or looking for a fun culinary project, this recipe delivers layers of flavor and visual appeal.
What Is a Bloomin’ Onion?
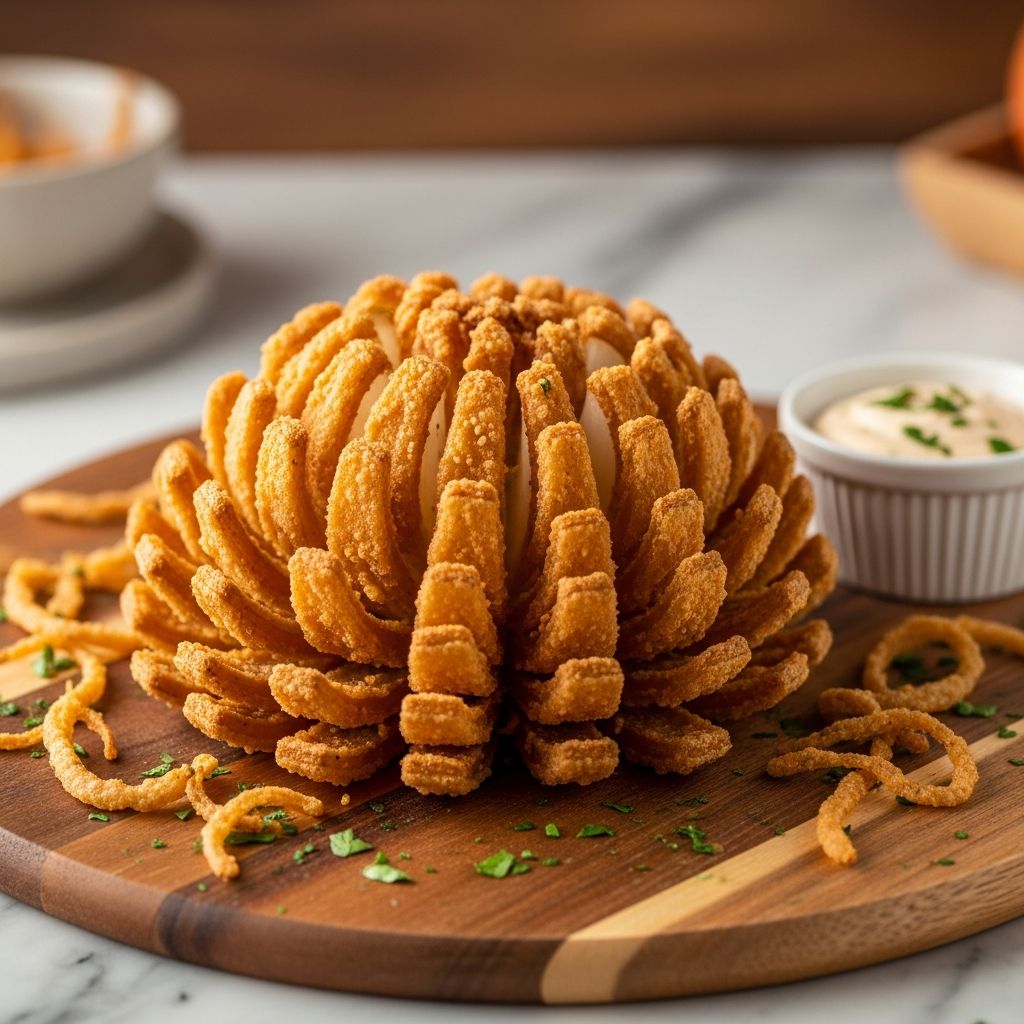
A bloomin’ onion is a large onion that’s cut to resemble a flower, dredged in a flavorful seasoned coating, and deep-fried until crispy and golden brown. Each ‘petal’ can be pulled off and dipped, making it a favorite for sharing as a party starter or game-day snack. It’s a dish famously served in major American restaurants but is surprisingly achievable at home with the right technique.
Ingredients & Equipment Needed
Gather the following ingredients and tools to ensure your bloomin’ onion turns out crisp, flavorful, and beautifully presented.
Ingredients
- 1 large white or sweet onion (the bigger, the better)
- 2 cups all-purpose flour
- 1 tablespoon paprika
- 2 teaspoons garlic salt
- 1 teaspoon ground cayenne pepper
- 1 teaspoon dried oregano
- 1 teaspoon cumin
- 1 teaspoon black pepper
- 2 large eggs
- 1 cup whole milk
- Vegetable oil for frying (enough to submerge the onion)
- Salt (for post-frying seasoning)
Suggested Equipment
- Large, sharp chef’s knife
- Cutting board
- Large mixing bowls (at least 2)
- Deep pot or deep fryer
- Slotted spoon or spider strainer
- Kitchen thermometer (to monitor oil temperature)
- Paper towels (for draining)
- Small bowl (optional, for dipping sauce if desired in the center)
Step-by-Step Recipe for a Restaurant-Style Bloomin’ Onion
1. Preparing and Cutting the Onion
The striking look of a bloomin’ onion begins with meticulous slicing. Follow these steps to transform a simple onion into a dramatic, flower-like centerpiece:
- Trim the Onion: Slice off the top (stem end) of the onion and peel off the outer skin, leaving the root end intact—this will hold the petals together while cutting and frying.
- Petal Cuts: Place the onion cut-side down. Starting about 1/2 inch from the root, make a clean downward cut all the way through. Repeat, rotating the onion, to create 12–16 evenly spaced cuts (the number of petals) around the perimeter. Ensure you don’t cut through the root.
- Open the Onion: Flip the onion right-side up. Gently separate the layers with your fingers to form ‘petals.’ If needed, cut a little deeper to help the onion bloom more fully, but avoid cutting so deep that the onion falls apart.
- Optional: Use a melon baller to carefully remove the center—this creates space for a dipping sauce bowl later.
2. Seasoned Flour Coating
The signature crunch of a bloomin’ onion comes from a robust spiced flour coating. Make it as follows:
- In a large bowl, combine all-purpose flour, paprika, garlic salt, cayenne pepper, oregano, cumin, and black pepper. Stir well to distribute spices evenly.
- Place the onion, cut side down, into the flour mixture. Cover with a plate and gently shake to help the flour get into the petals. Flip the onion over and, using your hands, carefully work the flour into every petal ensuring even coating.
3. Egg Wash for Adhesion
- In a second large bowl, whisk together eggs and milk until well combined.
- Shake excess flour from the onion. Dunk the whole onion cut-side down into the egg mixture. Flip and make sure the egg wash coats every petal—this will help the next layer of flour adhere fully.
4. Double Dredging for Ultimate Crunch
- Return the egg-washed onion to the seasoned flour. Thoroughly coat every petal once more—this double dredging is crucial for a thick, crispy shell. Gently tap off any excess flour, so the batter isn’t clumpy.
5. Frying the Onion
Getting the texture just right depends on proper frying technique. Here’s exactly what to do:
- Fill a deep pot or deep fryer with vegetable oil until there’s enough to submerge the onion fully (around 3–4 inches deep).
- Heat oil to 375°F (190°C). Use a kitchen thermometer to monitor the temperature—if the oil is too cool, the breading will absorb oil and become soggy; too hot, and the outside may burn before the inside cooks through.
- Carefully lower the coated onion, cut-side down, into the hot oil. Fry for 3 minutes.
- Gently flip the onion to root-side down and continue frying for 3 more minutes until deep golden and crisp on all sides.
- Remove using a slotted spoon to a plate lined with paper towels. Sprinkle with a little salt while hot.
Expert Tips for Success
- Choose the Right Onion: A large, sweet white onion works best for a bloomin’ onion’s delicate flavor and successful blooming.
- Don’t Cut Through the Root: Keeping the root intact holds the onion together during frying.
- Use Ample Oil: The onion must float and be submerged to crisp all over; too little oil results in uneven frying.
- Maintain Oil Temperature: Let the oil reheat between batches to ensure each onion fries up crispy, not greasy.
- Shake Off Excess Coating: Excess flour or batter can clump, so gently shake between each dredging step.
- Consider Air Fryer Version: A similar effect can be achieved in an air fryer for a lighter, less oily version. Consult your machine’s instructions for timing and temperature adjustments.
Making the Perfect Dipping Sauce
A bloomin’ onion is traditionally served with a zesty, creamy dip. Try this classic version for the full steakhouse experience:
- 1/2 cup mayonnaise
- 2 tablespoons ketchup
- 1 tablespoon prepared horseradish
- 1/2 teaspoon paprika
- 1/2 teaspoon garlic powder
- 1/4 teaspoon dried oregano
- Salt and black pepper to taste
Whisk all ingredients together until well combined. Chill before serving for best flavor.
Serving Suggestions
- As an Appetizer: Place a small bowl of dipping sauce in the center of the onion. Serve immediately while hot and crispy.
- As a Party Platter: Pair with other finger foods like wings, mozzarella sticks, or potato skins.
- As Part of a Meal: Serve alongside burgers, grilled meats, or as a festive side dish.
Bloomin’ Onion Troubleshooting & Common Questions
Successfully making a bloomin’ onion is mostly about technique. Here are answers to some frequently asked questions and practical troubleshooting tips.
FAQs
- Q: Why did my onion fall apart?
A: Most likely, the root was cut too deeply or too much of it was removed during preparation. Leave enough root intact to hold the petals together during slicing and frying. - Q: How do I keep the petals from clumping during frying?
A: Carefully separate the petals when coating with flour and egg. After each dredge, tap the onion gently to remove excess. Don’t overcrowd the fryer. - Q: Can I make it ahead of time?
A: A freshly fried bloomin’ onion is best. If needed, you can prepare and coat the onion a couple of hours in advance and refrigerate, frying just before serving. - Q: What oil should I use?
A: Use oils with a high smoke point like vegetable, canola, or sunflower oil. - Q: Is there a baked version?
A: While you can air fry or bake, these methods may result in less even crispiness than traditional deep frying. Use a convection oven or air fryer at high heat and monitor closely, flipping if needed. - Q: What’s the best way to reheat leftovers?
A: For best results, reheat in an oven or air fryer at 350°F until hot and crisp. Avoid microwaving, as this can make the coating soggy. - Q: How do I make it gluten-free?
A: Substitute a gluten-free flour blend for the all-purpose flour and confirm your seasonings are gluten-free.
Bloomin’ Onion vs. Other Fried Onion Appetizers
| Appetizer Type | Key Features | Serving Style |
|---|---|---|
| Bloomin’ Onion | Whole onion; flower shape; crispy seasoned petals | Shared; centerpiece; paired with creamy dip |
| Onion Rings | Individual slices; breaded & fried; crispy | Side or snack; served with dip or alone |
| Fried Onion Petals | Petal-shaped slices; battered and fried | Shared or side; served with dipping sauce |
Troubleshooting: Key Points for Success
- Make sure to cut petal slices evenly spaced for uniform blooming and thorough cooking.
- Double dredging creates a thicker, crunchier shell.
- High oil temperature is critical for a crispy, non-greasy result.
- If the onion browns too quickly, the oil may be too hot—reduce heat and monitor.
Creative Variations & Serving Ideas
- Spicy Kick: Add more cayenne or a pinch of chili powder to the flour mixture.
- Herb Twist: Mix in fresh chopped parsley or chives for extra flavor and a pop of color.
- Cheesy Finish: Sprinkle parmesan over the onion as it cools for a cheesy crust.
- Mini Bloomins: Use smaller onions to make individual portions—great for parties and sharing platters.
Summary
With the techniques and tips outlined in this guide, you can create an impressive bloomin’ onion that rivals any restaurant. The keys are in a careful cut, double dredging, and frying at the right temperature. Don’t forget the creamy dipping sauce for a true crowd-pleaser. Enjoy experimenting with spices and serving styles to make this iconic appetizer your own!


