How to Craft Trendy Leather Stud Bracelets at Home
Discover a step-by-step guide to creating stylish, colorful leather stud bracelets using simple tools and creative flair.

How to Make Leather Stud Bracelets
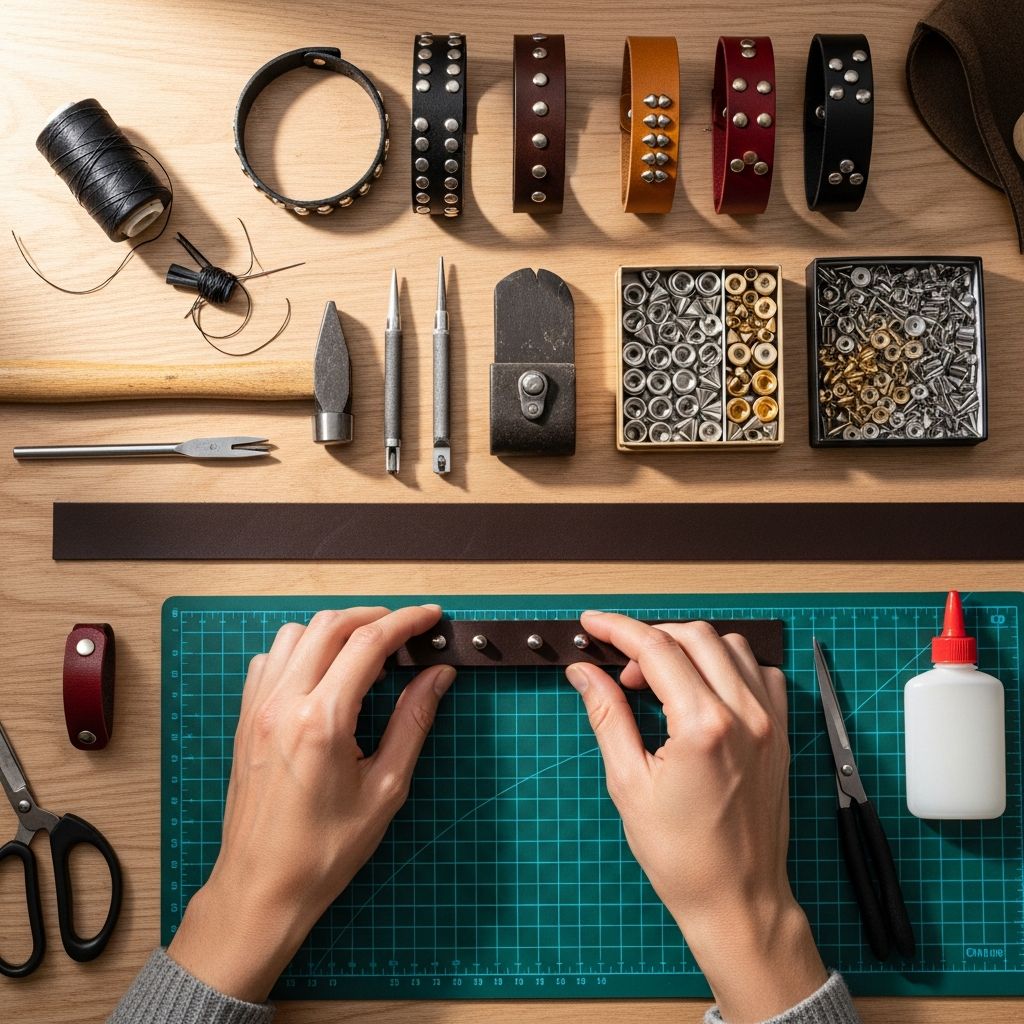
Add a personal touch to your accessory collection by learning how to create leather stud bracelets. Whether you’re inspired by boho fashion, rock aesthetics, or just love stacking creative pieces on your wrist, this tutorial will guide you through every step needed to make your own fashionable bracelet. Embrace the DIY spirit and transform simple supplies into statement accessories that reflect your unique style.
Why Make Your Own Leather Stud Bracelets?
Leather stud bracelets are a versatile accessory, blending easily with both casual and edgy wardrobes. By making them yourself, you can select colors, sizes, and patterns that suit you best, all while enjoying an affordable, customizable craft. Handmade bracelets also make great personalized gifts for friends and family.
Supplies You Will Need
- Leather scraps – Try craft stores, leather shops, or online, such as Etsy. For a vegan option, use synthetic leather or vinyl.
- Studs – Available in multiple shapes and sizes at craft and leather stores, or online in the “supplies” section.
- Snap components – These act as the bracelet’s clasp or fastening mechanism.
- Hammer – Essential for setting snaps.
- Sharp scissors – For cutting leather cleanly.
- X-Acto knife or utility knife – For small incisions where studs will go.
- Cutting mat or sturdy piece of cardboard – Protects your work surface.
- Ruler measuring tape – For accurate sizing.
- Optional: Paints, markers, or stamps for added decoration.
Sourcing Tips for Materials
- Leather scraps can be costly in large pieces. Search for remnants at craft stores or look for affordable scrap bags at local leather shops.
- Vegan alternatives like high-quality faux leather or vinyl can be found at fabric stores.
- For a wide variety of studs or specialty designs, search “studs” or “findings” under the “supplies” section on online marketplaces.
Step-by-Step Guide: Assembling Your Leather Stud Bracelet
1. Cutting the Leather
Begin by measuring your wrist. Cut a strip of leather about 3/4-inch wide and at least one inch longer than your wrist’s circumference. The extra inch allows for securing the clasp and achieving a comfortable fit. Using the scissors, round each end of your leather strip for a polished finish.
2. Planning and Marking Stud Placement
- Decide where you want your studs to be positioned—symmetrical along the center, staggered, or clustered at the ends.
- Take a stud and press it, prong side down, into the leather at desired points. This leaves small indentations indicating where to cut.
- Experiment by loosely arranging all studs before making incisions to ensure your design is balanced and functional.
3. Making Incisions for Studs
Using an X-Acto knife, carefully make small cuts at each marked indentation. Be sure to work on a cutting mat or cardboard to avoid damaging your workspace.
4. Attaching the Studs
- Push the prongs of each stud through the incisions in the leather.
- On the reverse side, fold each prong flat so that the stud is secure.
- Continue this process until all studs are attached. Most bracelets will use 6–10 studs, depending on length and design.
5. Installing the Snap Fasteners
- At each end of the bracelet, make a small incision to fit your snap components.
- Attach the snap by following the manufacturer’s instructions—usually, this will involve placing each half of the snap on opposite ends, ensuring they face each other, and setting them with a hammer.
- Double-check alignment before hammering to avoid an unusable clasp.
6. Final Check and Adjustments
- Test the snap closure to be sure it works smoothly and holds securely.
- Inspect the inside for any sharp prongs; flatten further if needed to prevent scratching your wrist.
Alternative Materials and Designs
- For a colorful twist, use brightly dyed leathers or add painted patterns before attaching the studs.
- Explore vegan materials like faux leather, vinyl, or canvas for animal-free options.
- Combine studs with embroidery, beads, or painted designs for a bohemian or bold aesthetic.
Care and Storage Tips
- Leather Care: Clean with a dry cloth and avoid soaking. If needed, apply a leather conditioner.
- Vegan Leather: Wipe gently with a damp cloth. Avoid harsh cleaners.
- Storage: Store your bracelets flat in a cool, dry place out of direct sunlight to prevent color fading or warping.
Creative Inspiration and Variations
- Stacking Styles: Wear several bracelets in complimentary colors and textures for a modern, layered look.
- Mix and Match: Pair leather stud bracelets with metal bangles, beaded stretches, or delicate chain bracelets for variety.
- Gift Ideas: Personalize your designs with initials, symbols, or favorite colors for thoughtful gifts.
- Painted Leather Variation: Try painting geometric shapes, stripes, or abstract designs on your leather strips before adding studs for a fun and modern twist.
Table: Supplies Checklist
| Item | Purpose | Tips |
|---|---|---|
| Leather Scraps | Main bracelet material | Choose medium/flexible thickness for comfort |
| Studs | Decorative elements | Pick shapes and finishes (gold, silver, gunmetal) |
| Snap Components | Closure | Ensure snaps are the correct size for your leather width |
| Hammer | Setting snaps | Use light taps to avoid damaging leather |
| Scissors & X-Acto Knife | Cutting leather & incisions | Keep blades sharp for clean cuts |
| Cutting Mat / Cardboard | Protect work area | Always cut on a safe, flat surface |
Frequently Asked Questions (FAQs)
Q: Can I make these bracelets without professional leather tools?
A: Yes! Basic household items like sharp scissors and a craft knife can substitute for specialty tools as long as you work carefully and safely.
Q: What if I don’t have snap fasteners?
A: Alternatives include using button studs, tying the ends with leather cord, or sewing on hook-and-eye closures for simple options.
Q: How do I make my bracelet adjustable for different wrist sizes?
A: Add multiple snap components along one end, or use punch holes and a buckle-style closure to allow adjustment.
Q: Are there recommended vegan materials?
A: High-quality synthetic leather and vinyl offer the look and feel of real leather, and can be sourced at many fabric and craft stores.
Q: Can I add other decorations besides studs?
A: Absolutely! Incorporate paint, embroidery, charms, or beads to expand your design possibilities and create unique combinations.
Expert Tips for Success
- Always measure your wrist for a precise fit. A too-tight bracelet can be uncomfortable, while a too-loose fit may cause loss or snagging.
- Use a marker or tailor’s chalk to evenly space your studs before cutting to ensure a symmetrical look.
- Test the snap positions before setting to avoid mismatched closures.
- For children’s bracelets or those with sensitive skin, check that all stud prongs are fully flattened to avoid scratching or irritation.
- If you make a mistake in placement, many stud marks are small—simply adjust your design or conceal with paint or embellishments.
Explore More Bracelet Ideas
- Painted Leather Bracelets: Add unique touches with acrylic paint, metallic markers, or even fabric paints for bold and artistic flair.
- Woven or Stitched Accents: Use colorful embroidery floss or thin cords to weave designs along the bracelet for added interest.
- Multi-Row Studs: Experiment with double or triple rows of studs for a dramatic, punk-inspired statement piece.
Conclusion
Making your own leather stud bracelets opens up a world of creative potential. Choose your favorite materials, customize with unique patterns or embellishments, and enjoy a practical, stylish accessory crafted by your own hand. Whether you wear them daily or reserve for special events, your handmade bracelet will be both eye-catching and meaningful.
References
- https://abeautifulmess.com/how-to-make-leather-stud-bracelets/
- https://blog.youtalent.com/custom-leather-cuff-tutorial-design-your-own-statement-bracelet/
- https://www.instructables.com/How-To-Studded-Bracelet/
- https://www.cchobby.com/leather-strap-bracelets-decorated-with-stitching
- https://www.instructables.com/How-to-Make-a-Studded-Bracelet-From-a-Scrap-Jacket/
- https://www.youtube.com/watch?v=Ed0vvNWJv98
- https://www.youtube.com/watch?v=Zbm8xiWsyZA
- https://www.youtube.com/watch?v=gkn5gypvWrk


