How to Make a Halloween Countdown Calendar: Felt Pocket DIY Guide
Celebrate spooky season with a handmade felt countdown calendar, complete with pockets for treats, notes, or surprises.

Halloween Countdown Calendar DIY: Create a Spooky Tradition
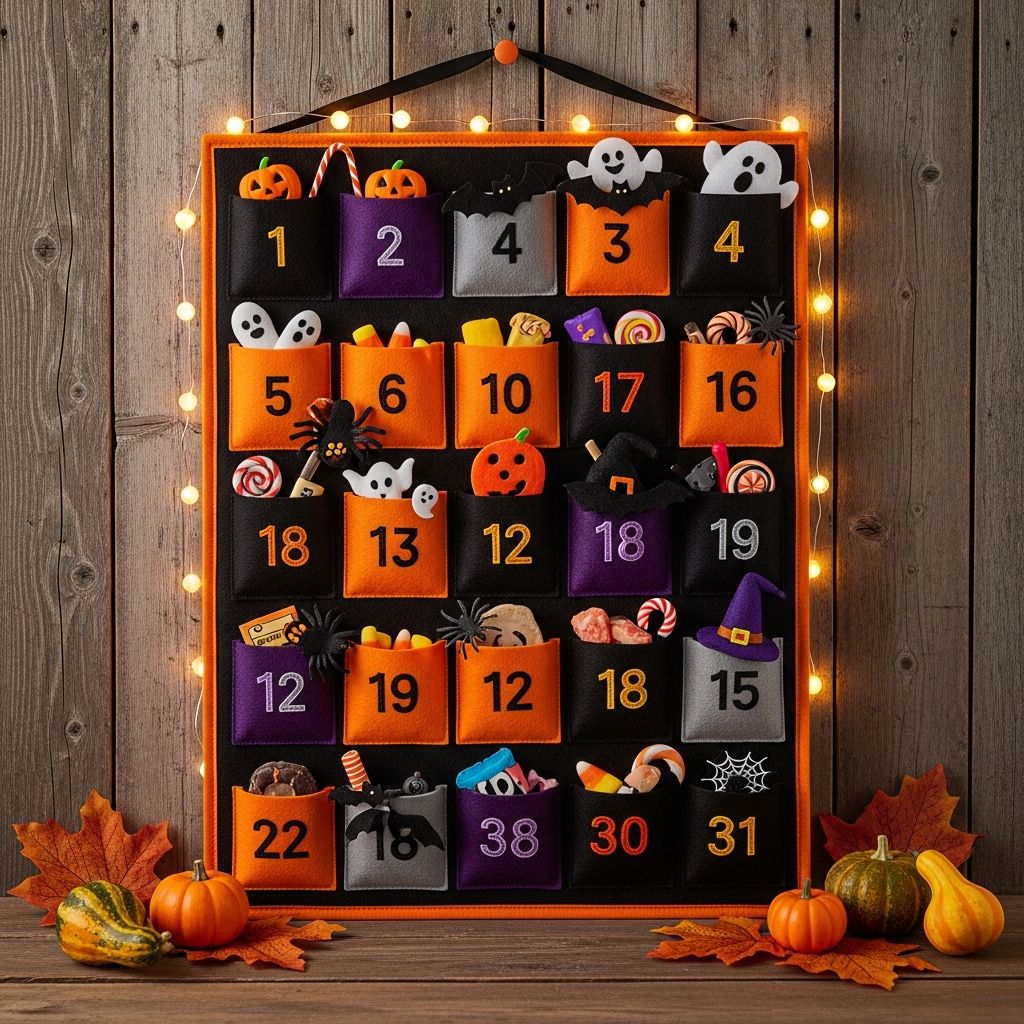
Count down the days to Halloween with a festive, handmade felt calendar brimming with personality and charm. As the leaves turn and chills fill the air, building a daily ritual brings families together in anticipation of spooky fun. In this guide, you’ll learn how to make your own Halloween Countdown Calendar, complete with thirty-one felt pockets—one for each day in October. Each pocket can be filled with surprises, notes, treats, or tiny toys, turning every day into a small celebration.
Why Make a Halloween Countdown Calendar?
A Halloween countdown calendar is more than decor—it’s a family tradition that builds excitement for the season. Inspired by Christmas advent calendars, this project adds creative flair to your Halloween preparations. Whether you fill pockets with jokes, activities, candy, or simple messages, everyone in the household can join in the daily ritual.
- Family bonding: Gather together each day for a shared moment of fun and surprise.
- Creativity: Personalize each pocket with hand-picked treats or themed notes.
- Reusable decor: Made from felt and embellishments, your calendar will last for years.
- Customizable: Match your color scheme, add unique decorations, and make it truly your own.
Supplies You’ll Need
Gather your materials before you start, ensuring you have everything on hand for a smooth crafting session. Most items are readily available at craft stores or online.
- Dowel rod – For hanging your finished calendar.
- Large felt piece (approx. 18×32 inches) – Acts as the main banner.
- Colored felt sheets – Used to create 31 small pockets (each 3×3 inches).
- Embellishments:
- Buttons (for added flair—try pumpkins, bats, or stars)
- Embroidery floss and needle (optional, for decorative stitching)
- Wooden stars or similar accents
- Stamps and permanent ink or fabric paint for extra designs
- Craft glue or needle and thread – For attaching pockets and embellishments.
- Sharp scissors – Essential for clean felt cuts.
- String or ribbon – To hang your calendar from the dowel.
- Halloween garland (optional) – For extra spooky decoration.
Step-by-Step Instructions
Estimated time: 4-5 hours, including detailed embellishment. If you skip hand-stitching and use glue, it can go faster.
1. Cut Out the Banner and Pockets
- Cut your large felt piece into a rectangle, approximately 18 inches wide by 32 inches long. This is the background of your calendar.
- From colored felt sheets, cut 31 pockets, each measuring 3×3 inches.
2. Embellish the Pockets
- Before attaching, decorate each pocket with buttons, stitches, stamps, or paint. Get creative with Halloween motifs like pumpkins, ghosts, spiders, and stars.
- Buttons can be sewn on, while things like wooden stars can be glued.
- Let all paint and glue dry fully before moving on.
3. Attach the Pockets to the Banner
- Lay out all embellished pockets on your main felt piece in a grid (for example, 5 rows of 7, with a final row of 3 pockets).
- Use craft glue or carefully stitch the sides and bottom of each pocket, leaving the top open so you can slide in treats.
4. Add the Dowel Rod and Hanger
- Fold the top edge of your felt banner over a dowel rod and glue or sew to create a secure loop.
- Tie a length of string or ribbon to each end of the dowel for easy hanging.
5. Final Embellishments
- For extra flair, drape Halloween garlands, string wooden bead spiders, or attach faux cobwebs around the banner.
- Place the finished countdown calendar on a wall where it is visible and easy to reach for daily surprises.
Personalization Ideas & Embellishments
- Number the pockets from 1 to 31 using iron-on numbers, stamps, or stitched embroidery for a hand-finished look.
- Use distinctive colors or themes per week (e.g., each row a separate color) for visual interest.
- Incorporate glow-in-the-dark felt, glitter paint, or shiny sequins to ramp up the spooky fun.
- Try different themes, such as witchy, monster, or vintage Halloween.
- Layer embellishments: combine buttons, mini pom-poms, and small appliqué shapes for extra texture.
What to Fill Your Halloween Countdown Calendar With?
Make each day special by tucking a little surprise in every pocket. Here are some fun, non-candy ideas to keep up the excitement!
- Mini Halloween erasers, stickers, or temporary tattoos
- Seasonal jokes, riddles, or spooky trivia
- Little notes with daily activities (e.g., “Make pumpkin pancakes” or “Have a spooky movie night”)
- Small toys or figurines
- Glow sticks, rings, spider rings, or themed pencils
- Personalized messages or kindness prompts
Of course, candy treats are always welcome—choose what’s best for your family and their ages.
Tips for a Successful DIY Halloween Countdown
- Plan ahead: Start your project in September or early October to ensure it’s ready for the countdown.
- Get the kids involved: Allow children to help with pocket decorating, numbering, or even choosing the daily surprises.
- Use sturdy felt: High-quality felt and glue will improve the durability, so your calendar lasts year after year.
- Store with care: After Halloween, gently remove remaining treats, roll the calendar, and store in a sealed container to protect embellishments.
Halloween Calendar Banner: Dimensions & Layout
| Feature | Dimension/Details |
|---|---|
| Banner size | 18 inches wide x 32 inches long |
| Pocket size | 3 x 3 inches each |
| Number of pockets | 31 (one for each day in October) |
| Materials | Main felt piece, colored pocket felts, buttons, embellishments, wooden stars |
| Assembly time | 4–5 hours (less if skipping embroidery) |
Making Your Calendar Reusable
- Choose sturdy adhesives: Opt for craft glue rated for fabric or consider hand-stitching pockets for extra longevity.
- Avoid perishable treats: If storing for the next year, replace perishables with keepsake toys or reusable notes.
- Refresh decorations: Each season, update embellishments or pocket fillers for renewed excitement!
Inspiration: Decorating Your Halloween Space
Your countdown calendar shines as the centerpiece of a Halloween wall display. Complement it with:
- Spooky garlands: Wooden spiders, felt bats, or pom-pom monsters
- Pumpkin lights or neon string lights
- Halloween-themed wall art or framed printables
- Faux cobwebs and plastic spiders for an extra spooky touch
Layer textures and use a bold color scheme to make your countdown the room’s attention-getting feature.
Frequently Asked Questions (FAQs)
Q: What age group is this calendar best for?
A: The calendar is ideal for young children, but with creative fillers and decorations, it can be enjoyed by older kids and adults as well.
Q: Can I use a sewing machine instead of glue?
A: Absolutely! Sewing the pockets offers extra durability and a finished appearance, though fabric glue is a fast and effective alternative.
Q: What should I do if I can’t find felt locally?
A: Many online craft retailers sell felt by the sheet or yard. Alternatively, use heavy cotton, fleece, or craft foam as substitutes.
Q: How do I store the calendar between seasons?
A: Remove all pocket contents, roll the calendar gently, and store in an airtight plastic bin. This helps keep dust and bugs away, preserving its details for next year.
Q: How long does the calendar take to make?
A: Plan for about 4-5 hours, depending on the complexity of your embellishments and whether you choose to sew or glue. Skipping embroidery reduces the total time significantly.
Start Your Spooky Season Tradition!
The best part of this Halloween countdown calendar project is watching excitement build as October unfolds. Display your handmade calendar proudly, and enjoy each day’s surprise with your loved ones. From spooky notes and games to sweet treats, this calendar is sure to inspire joy and creativity all month long. Wishing you a magical, crafty, and delightfully spooky Halloween season!


