Easy DIY Galaxy Nails: Step-by-Step Tutorial for a Stunning Manicure
Turn your nails into breathtaking galaxies with this foolproof, creative step-by-step guide for a mesmerizing manicure at home.
n
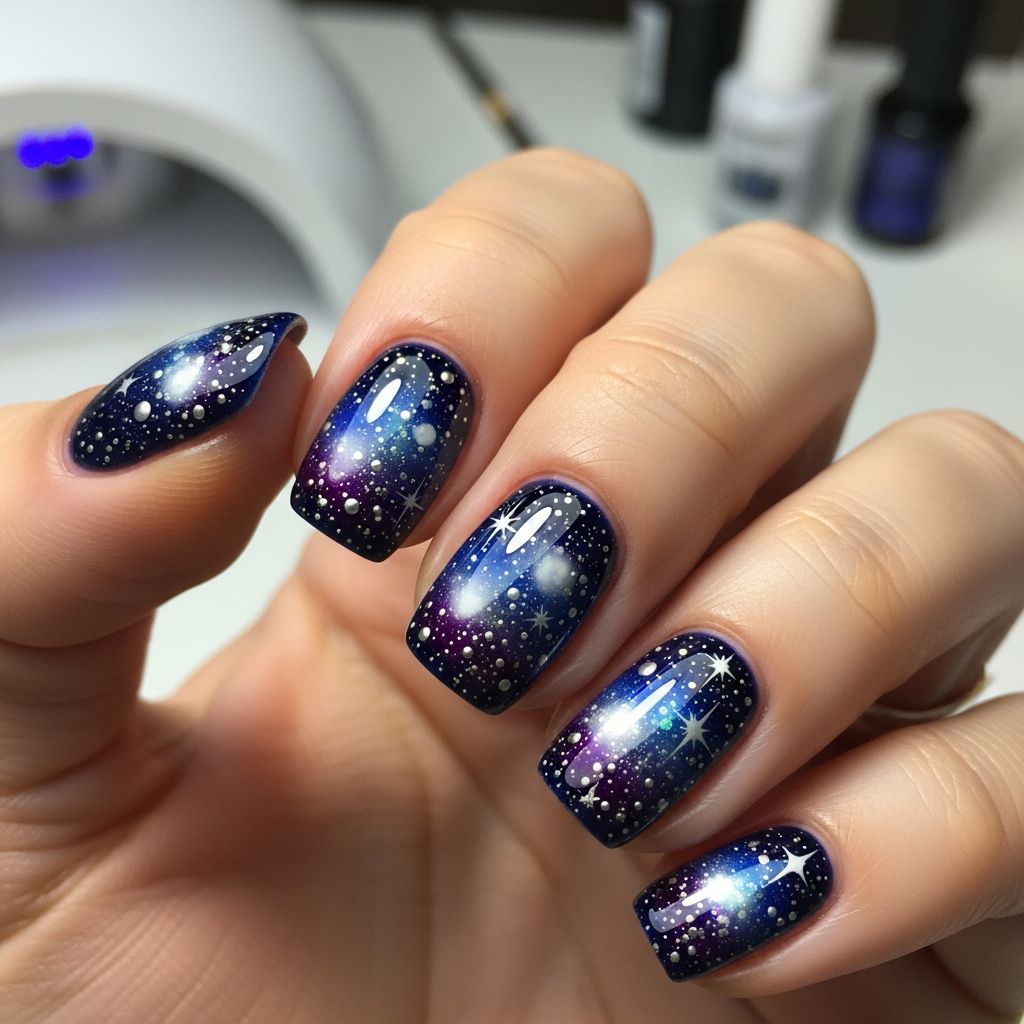
Galaxy nail art has taken the beauty world by storm, captivating manicure lovers with its cosmic blend of color, shimmer, and celestial charm. If you’re eager to turn your nails into mesmerizing constellations, you’re in luck: this easy galaxy nails tutorial walks you through every step, from gathering supplies to finishing touches, so you can create your own stellar nail art at home.
nn
Why Try Galaxy Nail Art?
n
This design is ideal for both beginners and nail art enthusiasts because it looks intricate yet is surprisingly simple to achieve. The combination of sponged colors, sparkling accents, and star details creates a multidimensional effect that’s perfect for special occasions, parties, or just adding a bit of cosmic flair to your everyday look.
nn
Essential Supplies for Galaxy Nails
n
Before you begin, assemble the following items for a neat, professional result:
n
- n
- Black nail polish (for the base)
- Acrylic paint or polish in blue, plum/purple, white, turquoise, and silver sparkle
- Clear top coat (to seal and add shine)
- Makeup sponge (wedge or round, small size works best)
- Toothpicks (for creating tiny stars and details)
- Nail polish remover and cotton swabs (for quick clean-up)
- Disposable plate or palette (for dabbing paint or polish)
n
n
n
n
n
n
n
n
Tip: You can use nail polish instead of acrylic paint, but acrylics can offer greater blending flexibility and easy clean-up.
nn
Step-by-Step Guide: How to Paint Galaxy Nails
n
Follow these simple steps to achieve your dreamy galaxy manicure:
nn
Step One: Apply the Black Base
n
n 1. Paint 1–2 coats of black nail polish on clean, dry nails. This deep, opaque foundation will help your galaxy colors pop.n
n
n 2. Allow the coats to dry completely before moving on.n
nn
Step Two: Sponge on Nebula Colors
n
n 1. Pour a little bit of each acrylic color (blue, plum, turquoise, white, and silver sparkle) onto your palette.n
n
n 2. Using your makeup sponge, pick up a small amount of white paint and gently dab it in random, cloud-like patches on each nail. White helps colors appear more vibrant and mimics the glowing cores of distant stars.n
n
n 3. Next, use the clean areas of your sponge to gently apply blue and purple over sections of the white. Overlap the colors slightly for natural blending.n
n
n 4. Add turquoise sparingly for extra dimension. Continue sponging until the look is soft and spacey. Leave patches of black visible on each nail for depth.
n
n 5. Finally, pick up a tiny amount of silver sparkle and dab it on top. Use this very sparingly—too much glitter can overpower the design.n
nn
Step Three: Add Stars and Details
n
n 1. Dip a toothpick into white paint or polish, then dot tiny stars at random across your nails. Cluster some dots closer together and scatter others for a realistic starfield effect.n
n
n 2. To add a “starburst,” draw a tiny cross-shaped star by intersecting two short lines. Make one or two on each nail for an accent.n
nn
Step Four: Seal With a Top Coat
n
n 1. Once your paint is fully dry, apply a clear top coat to each nail. This not only adds a radiant shine, but also protects your art and prevents chipping.n
n
n 2. Allow your nails to dry completely—avoid smudging your cosmic masterpiece!n
nn
Pro Tips for Perfect Galaxy Nails
n
- n
- Less is more: Use a light touch with the sponge and sparkle to avoid muddying the design.
- Leave negative space: Allow areas of black base to show through for a realistic “deep space” effect.
- Customize colors: Try swapping in pinks, metallics, or gold for a personalized galaxy. Experiment with different color combinations for unique results.
- Clean up edges: Use a small brush or cotton swab dipped in polish remover to tidy up around your cuticles after sponging.
- Play with texture: For added interest, consider using a matte top coat over the entire manicure or just one accent nail for contrast.
n
n
n
n
n
nn
Suggested Variations & Inspiration
n
- n
- Accent Nail: Paint only ring fingers or thumbs with the galaxy effect and keep the rest solid black or metallic for a subtle twist.
- Decals & Stickers: If you prefer not to DIY, try galaxy-themed nail stickers, decals, or press-on options for instant celestial style.
- Add Tiny Planets: Use a dotting tool or the edge of a toothpick to add colored dots for planets, or touch up with silver and gold for shooting stars.
- Layer Different Glitters: Experiment with holographic or iridescent glitters for an interstellar sparkle.
n
n
n
n
nn
FAQ: Galaxy Nails DIY
n
Q: Can I use regular nail polish instead of acrylic paint?
n
A: Yes, but acrylic paint is often easier for blending and cleanup. If you use polish, ensure each layer dries before adding the next.
nn
Q: What should I do if my sponge leaves harsh lines?
n
A: Tap very lightly, use minimal paint, and let each color dry before adding more. Overlapping with a dab of white or black can soften edges.
nn
Q: My nails smudged after adding the top coat. What went wrong?
n
A: Always let your design dry completely before applying top coat, and use a gentle hand to avoid dragging the design.
nn
Q: How can I make the stars stand out more?
n
A: Use a bright, opaque white and keep the star dots small. Add a tiny cross or starburst shape for focal points on each nail.
nn
Q: How long should this manicure last?
n
A: With a quality top coat, galaxy nails can last up to a week or longer. Touch up tips if needed and add another layer of top coat after several days for extra longevity.
n
nn
More Nail Art Tutorials You’ll Love
n
- n
- Hologram Dot Manicure: Add holographic dots with a simple dotting tool or bobby pin for an eye-catching look.
- Gold Star Manicure DIY: Use gold star stickers or confetti for an extra celestial design.
- Gold Daisy Dot Manicure: Create daisy patterns with a dotting tool and white/yellow polish for a floral vibe.
- DIY Holograph Foil Manicure: Achieve gleaming, reflective nails using nail foils in galaxy hues.
- Eye Manicure DIY: Paint quirky eye shapes for a fun and mystical touch.
n
n
n
n
n
nn
Shop the Look: Galaxy Nails, No DIY Required
n
If you prefer to skip painting, explore a variety of ready-made options for galaxy nails, including:
n
- n
- Decals and stickers with constellation designs
- High-quality press-on sets in cosmic patterns
- Reusable nail wraps with galaxy graphics
n
n
n
n
These alternatives provide a quick, hassle-free way to rock the galaxy trend—perfect for a last-minute event or effortless glam.
nn
When to Wear Galaxy Nails
n
Galaxy nails are perfect for:
n
- n
- Parties and nights out
- Girls’ night or sleepovers
- Halloween and costume events
- Cosplay or sci-fi conventions
- Everyday style with an artsy twist
n
n
n
n
n
n
This look turns heads and starts conversations, guaranteed!
nn
Troubleshooting and Maintenance Tips
n
- n
- Always allow each layer to dry fully before moving to the next to avoid smears.
- If you make a mistake, use a clean brush dampened with nail polish remover to gently erase small errors before the polish sets.
- Keep the rest of your nails and cuticles moisturized—nail art looks best on healthy hands.
- For extra durability, use a base coat under the black polish and reapply top coat every few days.
n
n
n
n
nn
Show Off Your Galaxy Nails!
n
Once you’ve finished your galaxy manicure, share your cosmic creations with friends or on social media using #GalaxyNails. Each attempt is unique, so celebrate your personal touch and creativity. Whether you DIY or opt for press-ons, galaxy nails are a dazzling way to express yourself and embrace the beauty of the universe—right at your fingertips.
nn
Frequently Asked Questions (FAQs)
n
Q: Will acrylic paint damage my natural nails?
n
A: If applied atop a base coat or nail polish, acrylic paint is safe and can be removed with warm water or acetone without damaging your nails.
n
Q: Can I use other tools instead of a makeup sponge?
n
A: Yes. While sponges are ideal for blending, you can use soft eyeshadow applicators or fine brushes for different effects.
n
Q: Is this technique suitable for short nails?
n
A: Absolutely! Galaxy designs suit any nail length and shape; just scale down the details for smaller nails.
n
Q: How do I prevent the colors from getting muddy?
n
A: Let each layer dry lightly before adding the next, and use small amounts of each color to avoid oversaturation.
n
Q: Where can I find inspiration for new galaxy color combos?
n
A: Look to photographs of real galaxies, nebulae, and the night sky, or experiment with neon and pastel hues for a creative twist.
n

