Easy Chocolate Oreo Truffles
Master the art of making delicious no-bake chocolate Oreo truffles with this comprehensive guide.
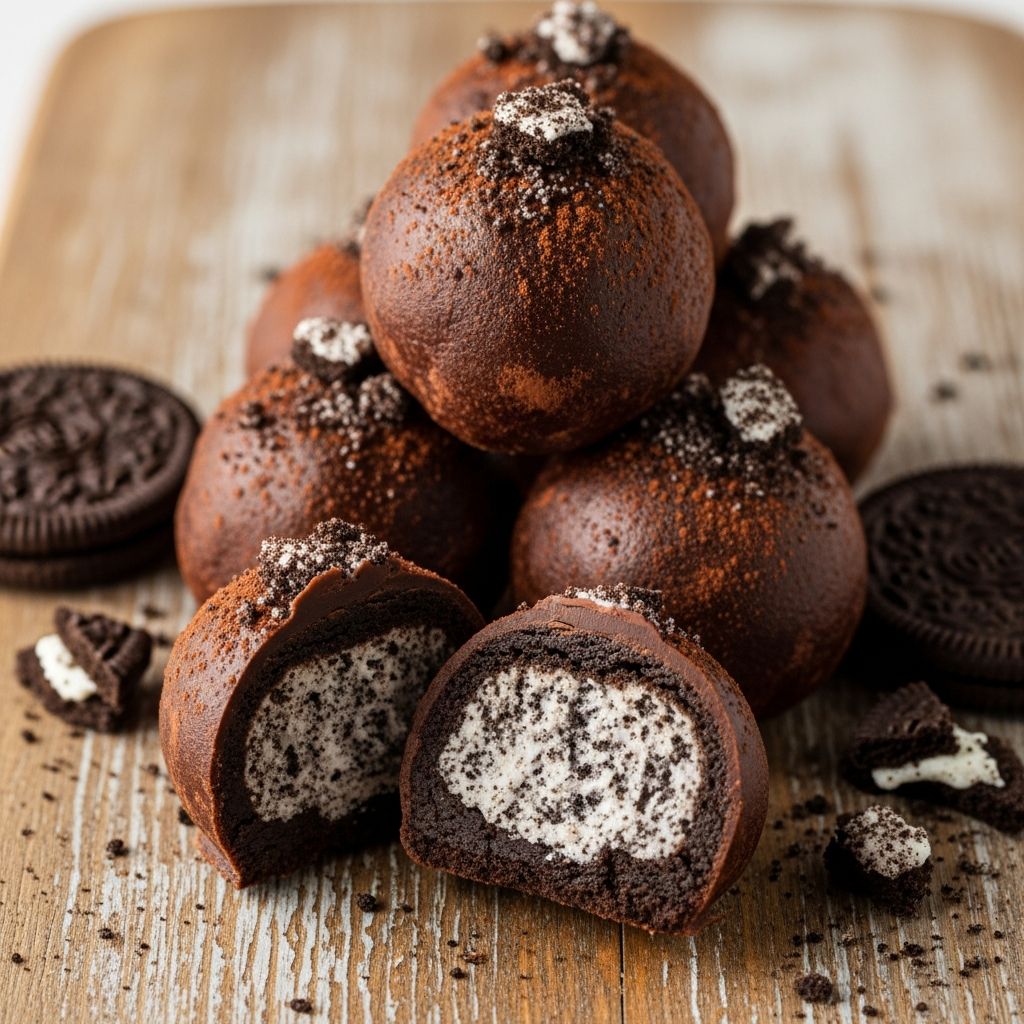
Oreo truffles are one of those desserts that seem far more complicated than they actually are. These delightful little chocolate-covered bites combine the beloved flavor of Oreo cookies with creamy filling and a smooth chocolate coating, creating a treat that tastes like it came from a fancy candy shop. The best part? You can make them right in your own kitchen with just a handful of ingredients and no baking required. Whether you’re looking for a quick dessert to impress guests, planning ahead for the holidays, or searching for the perfect homemade gift, Oreo truffles are an excellent choice that never disappoints.
Why You’ll Love This Recipe
This Oreo truffle recipe stands out for several compelling reasons. First and foremost, it requires minimal ingredients—just Oreo cookies, cream cheese, and chocolate—meaning you likely have everything you need already in your pantry. The recipe is completely no-bake, which means you can skip the oven and create something special without heating up your kitchen. Another major advantage is the time factor; these truffles come together quickly, typically taking less than thirty minutes of active work spread across a couple of hours including chilling time.
The recipe is also incredibly forgiving and adaptable. You can make these truffles well in advance and store them in the refrigerator for up to two weeks or freeze them for up to three months, making them perfect for meal prep and holiday planning. The texture is consistently fudgy and rich, with the cream cheese adding a subtle tanginess that balances the sweetness of the chocolate coating. Plus, there’s something deeply satisfying about rolling the mixture into perfect little balls and watching them transform into beautiful chocolate-covered treats.
Essential Ingredients Explained
Understanding your ingredients is key to success with this recipe. Each component plays a crucial role in creating the perfect Oreo truffle.
Oreo Cookies
You’ll need one standard package of Oreo cookies, which typically contains about forty-five cookies and weighs approximately 14.3 ounces. Make sure to use the entire cookie—both the chocolate wafers and the creamy filling. The filling actually contributes to the texture and flavor of your truffles, making it essential not to separate the cookies. If you want to experiment, you can try different varieties like Double Stuf Oreos for extra richness or Birthday Cake Oreos for a different flavor profile.
Cream Cheese
Block cream cheese is strongly recommended over tub cream cheese for this recipe. Block cream cheese contains less air, which means your truffles will maintain their shape better and hold up during storage. You’ll need one eight-ounce block of cream cheese brought to room temperature before mixing. Room temperature cream cheese blends more smoothly with the Oreo crumbs, creating a uniform, lump-free filling. Full-fat cream cheese is highly recommended as it provides better texture and richness compared to low-fat alternatives.
Chocolate
For the coating, you can choose milk, dark, or semisweet chocolate chips, depending on your preference. Quality matters here—good quality chocolate melts more smoothly and coats more beautifully than lower quality options. Chocolate melting wafers are an excellent alternative to chips and often melt more consistently. If you prefer white chocolate coating, that works wonderfully too and creates a beautiful contrast with the dark Oreo filling.
Step-by-Step Instructions
Prepare the Filling
Begin by placing your entire package of Oreo cookies into a food processor. Pulse them repeatedly until they break down into fine crumbs that resemble breadcrumbs in texture. If you don’t have a food processor, you can place the cookies in a sturdy ziplock bag and crush them with a rolling pin or the bottom of a glass until you achieve the same fine crumb consistency. Add your room temperature cream cheese to the food processor with the Oreo crumbs and pulse until the mixture becomes smooth and well combined. Transfer this mixture to a bowl, cover it, and refrigerate for approximately one hour. This chilling time allows the mixture to firm up, making it easier to roll into balls.
Shape the Truffles
Line a baking sheet with parchment paper or wax paper. Remove your truffle mixture from the refrigerator and, using a one-inch cookie scoop or tablespoon, portion out the mixture. Roll each portion between your palms into a one-inch ball, working quickly so the mixture doesn’t become too warm and sticky. If the mixture becomes too soft to work with, return it to the refrigerator for fifteen minutes. Place each formed ball onto your prepared baking sheet as you complete it. Once all balls are shaped, transfer the baking sheet to the freezer for thirty minutes or until the balls are firm. This freezing step is crucial as it prevents the balls from falling apart when you dip them in the warm melted chocolate.
Melt the Chocolate
While your truffles are freezing, prepare your chocolate for melting. Create a makeshift double boiler by placing a heat-safe glass bowl over a pot of simmering water, ensuring the bottom of the bowl doesn’t touch the water. Add your chocolate chips or melting wafers to the bowl and gently stir frequently until completely melted and smooth. Alternatively, you can melt chocolate in the microwave in thirty-second increments, stirring thoroughly between each interval until melted. Avoid overheating the chocolate, which can cause it to become grainy or thick. The chocolate should be warm but not scorching hot—if it’s too hot, let it cool for about five minutes before proceeding with dipping.
Dip and Decorate
Remove your frozen truffle balls from the freezer. Working with one ball at a time, use a dipping fork or two regular forks to submerge it into the melted chocolate, rotating gently to ensure even coating. Tap the fork gently against the side of the bowl to remove excess chocolate, then place the dipped truffle back on your prepared baking sheet. If you’d like to decorate, immediately add sprinkles, crushed Oreos, or other toppings while the chocolate is still wet. Continue this process with the remaining truffles. Allow the chocolate coating to set completely at room temperature or refrigerate for faster setting.
Pro Tips for Perfect Results
Temperature is absolutely critical when making Oreo truffles. If your dough balls are too warm when you dip them in chocolate, they’ll fall apart. If your chocolate is too hot, it will melt the cold filling inside. The sweet spot is having moderately cold truffles and melted chocolate that’s warm but not scorching. If your truffles crack during dipping, this usually indicates too large a temperature difference between the truffle and the chocolate.
Use a food processor for crushing the Oreos rather than doing it by hand. This ensures you get uniformly fine crumbs that incorporate smoothly with the cream cheese, creating a better texture in your finished truffles. When rolling the mixture into balls, work quickly and keep your hands clean and dry—this prevents sticking and makes shaping easier.
If you’re making large batches, keep your uncoated balls in the freezer until you’re ready to dip them, removing just a few at a time to work with. This prevents them from warming up too much. Consider setting up a chocolate-dipping station with all your tools and decorations within reach before you start dipping to maintain efficiency.
Storage and Make-Ahead Guide
One of the greatest advantages of this recipe is how well it stores. Finished Oreo truffles can be kept in an airtight container in the refrigerator for up to two weeks, making them perfect for preparing ahead for parties, events, or gift-giving. For longer storage, freeze the truffles in a freezer-safe airtight container for up to three months. To use frozen truffles, simply transfer them to the refrigerator to thaw for about thirty minutes before serving.
You can also make these truffles in stages. Prepare and shape the filling balls, freeze them on a baking sheet, then transfer them to a freezer bag for storage. When you’re ready to finish them, simply take out as many as you need and dip them in chocolate. This flexibility makes these truffles perfect for busy schedules.
Flavor Variations and Customization
While the classic version is delicious, there are numerous ways to customize this recipe to suit your preferences. Try adding a half teaspoon of vanilla extract or almond extract to the filling mixture for extra flavor depth. Use different varieties of Oreos such as birthday cake, golden, or mint flavored versions to create unique flavor combinations. For the chocolate coating, experiment with dark chocolate for a more sophisticated taste, white chocolate for a sweeter coating, or even peanut butter chocolate for added richness.
You can also add finely chopped nuts, crushed candy canes, or toasted coconut to the filling for texture variations. For decoration, try different sprinkles, cocoa powder, crushed candy, or even edible gold leaf for a luxurious presentation.
Troubleshooting Common Issues
Cracking Truffles
If your truffles crack when dipped in chocolate, the issue is typically temperature-related. Ensure your truffles are frozen solid but not rock hard, and let your chocolate cool slightly before dipping. The difference in temperature shouldn’t be too extreme.
Mixture Too Sticky
If your Oreo and cream cheese mixture is too sticky to work with, refrigerate it for fifteen minutes to thirty minutes until it becomes firmer and easier to handle. You can also lightly flour your hands to prevent sticking when rolling balls.
Chocolate Not Melting Smoothly
Use quality chocolate and avoid overheating. Melt slowly and stir frequently. If using chocolate chips, consider switching to melting wafers, which often have additives that help them melt more smoothly and consistently.
Balls Falling Apart During Dipping
This usually means your balls weren’t frozen solid enough or your chocolate was too hot. Ensure balls are completely frozen, and let hot chocolate cool for a few minutes before dipping. Work quickly to minimize time in the warm chocolate.
Frequently Asked Questions
Q: Can I make these without cream cheese?
A: Yes, you can substitute the cream cheese with butter or use a combination of crushed Oreos mixed with powdered sugar and a small amount of milk to create a paste. However, the texture will be slightly different from the original recipe.
Q: How long do Oreo truffles last?
A: Stored in an airtight container in the refrigerator, they last up to two weeks. In the freezer, they can last up to three months. Always keep them in an airtight container to prevent them from absorbing odors or drying out.
Q: Can I use a microwave to melt chocolate instead of a double boiler?
A: Absolutely. Microwave chocolate in thirty-second increments, stirring well between each interval until completely melted. This method often works just as well and is more convenient for many home cooks.
Q: What type of dipping tool works best?
A: Either two regular forks used together or a specialized candy dipping fork works well. Some people prefer dipping tools with clips on the end. Choose whichever method feels most comfortable and gives you the best control.
Q: Can I make these with white chocolate coating?
A: Yes, white chocolate works beautifully for coating Oreo truffles and creates a lovely visual contrast. The method is identical to using dark or milk chocolate.
Q: Are these truffles suitable for gift-giving?
A: They make excellent gifts. Package them in pretty boxes with decorative paper, and they look professionally made. They store well for up to two weeks, making them perfect for advance gift preparation.
Q: Can I double the recipe?
A: Yes, the recipe doubles easily. Simply use two packages of Oreos, two blocks of cream cheese, and five cups of chocolate chips. The process remains the same, though you may need to work in batches during the shaping and dipping stages.
Conclusion
Easy chocolate Oreo truffles represent the perfect intersection of simplicity and indulgence. With just three main ingredients and a straightforward process, you can create a treat that tastes far more complicated than it actually is. Whether you’re making them for yourself, preparing them for a gathering, or creating gifts for loved ones, this recipe delivers consistent, delicious results every single time. The flexibility to make them ahead, customize flavors and decorations, and store them for extended periods makes them an invaluable addition to any home cook’s dessert repertoire. Start making these truffles today and discover why they’ve become such a beloved homemade treat.


