How to Style Dutch Braided Bangs: Step-by-Step Tutorial & Tips
Master the Dutch braided bangs look with this thorough, easy-to-follow guide for gorgeous, face-framing braids.

Dutch Braided Bangs: A Complete Guide to Braiding Your Fringe
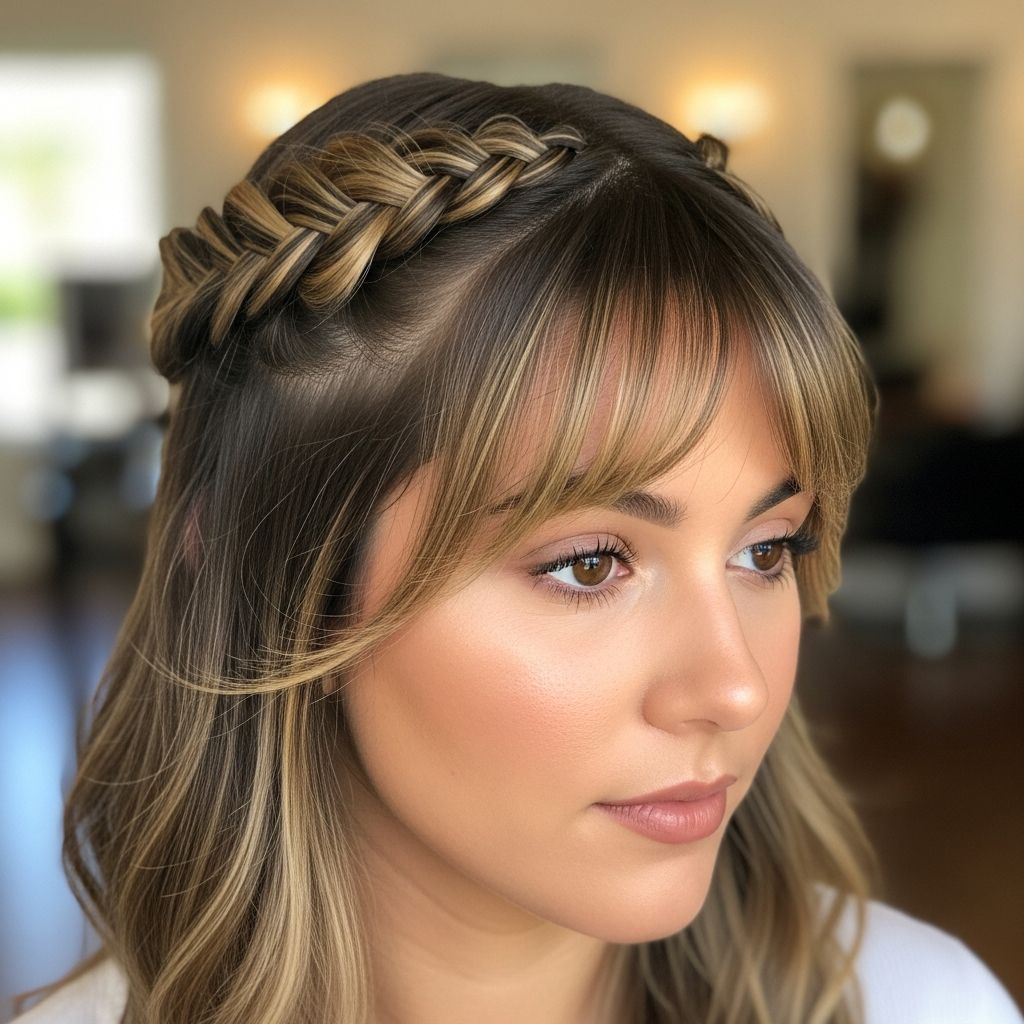
Looking to transform your hairstyle with a fresh, textured look? Dutch braided bangs offer a gorgeous, face-framing update that works with any hair type. Whether you’re wanting to keep hair out of your face, add detail to your daily style, or grow out your bangs in style, the Dutch braid is a versatile technique that anyone can learn. In this guide, you’ll discover everything you need to know—from basic steps and expert tips, to troubleshooting fringe and creative styling ideas.
What are Dutch Braided Bangs?
Dutch braided bangs are a styling technique where the front section of hair (the fringe or bangs) is woven into a tight, inverted braid that sits on top of the hair. Unlike a French braid, which lays the braid beneath the hair by crossing sections over the middle, the Dutch braid stands out by crossing sections under the middle, creating a reverse plait effect . This difference in direction gives a more pronounced, dimensional look—a perfect way to highlight your bangs and keep them neat and stylish.
Step-by-Step Dutch Braided Bangs Tutorial
Follow this detailed tutorial to create beautiful Dutch braided bangs at home. You’ll only need a few basic tools: a hairbrush, comb, small hair elastic, and some bobby pins or hairspray (optional for finishing).
- 1. Start with Clean, Dry Hair.
Brush out any tangles and decide if you want to braid on naturally straight hair, waves, or curls. Dutch braids work on a variety of textures . - 2. Deep Side Part.
Using the end of a comb, create a deep side part to determine where your braid will anchor. This will help frame the face and keep fringe secure . - 3. Section Your Bangs.
Separate a triangle section at the front near the part—this is where your braid will begin. Clip the rest of your hair out of the way so it doesn’t get caught in the braid . - 4. Divide Into Three Strands.
Take a small section at the front (near the part) and split it into three equal sections: a left, middle, and right strand. These will be the building blocks of your braid . - 5. Begin the Dutch Braiding Technique.
Start braiding by crossing the left strand under the middle, then the right strand under the new middle. The key for a Dutch braid is always braiding under, not over—this makes the braid pop . - 6. Add Hair to Each Section as You Go.
Pick up a small piece of hair from the hairline near your fringe and add it to the left section before crossing it under the middle. Repeat on the right: pick up a section, add it to the right strand, and cross under. Continue braiding along the hairline, pulling in small sections each time . - 7. Continue Down the Hairline.
As you move along the curve of your forehead, keep braiding under and adding hair for each new pass. Adjust the tightness to your liking—tighter for a sleek look, looser for soft, romantic braids . - 8. Finish the Braid.
Once you reach the end of your bang section (or wherever you’d like the braid to stop), continue with a regular braid (no added hair) for an extra couple of inches. Secure the end with a small, clear elastic . - 9. Secure and Blend.
If desired, pin the end of the braid behind your ear or blend it into the rest of your hair with bobby pins. For extra hold, use a touch of hairspray . - 10. Pancake the Braid.
To add volume, gently tug at the outer edges of the braid—this is called “pancaking.” Be cautious if you have short fringe pieces—pull gently to avoid them poking out .
Tips for Perfect Dutch Braided Bangs
- Work with Second-Day Hair: Hair that isn’t freshly washed often has more grip, making braiding easier and helping to prevent the braid from slipping.
- Use Texture Spray or Dry Shampoo: If your hair is too soft or slippery, add texturizing spray or a dash of dry shampoo to create grip for neater braids.
- Keep Sections Small: Especially for shorter bangs, using small, neat sections will make the braid lay flat and secure.
- Braid Tighter for Beginners: Start with a tight braid; you can always loosen it later. Loose braids are harder to manage on your first try.
- Practice the Hand Motions: The underhand crossing for Dutch braids is different from the overhand motion (used in French braids), so go slow and focus on the under-under technique .
Common Troubleshooting & Solutions
- Fringe Sticking Out? If your shorter fringe pieces poke out, rub a little hairspray on your fingertips and gently smooth the flyaways back into the braid. Pin any stubborn strands with a bobby pin hidden under the braid .
- Braid Looks Too Thin? After finishing, “pancake” or tug at the braid’s edge to make it appear thicker and more voluminous.
- Braid Not Visible Enough? Double-check that you’re crossing sections under, not over, for a raised braid. Add a contrasting ribbon or colorful hair tie to enhance the effect.
- Braiding Too Tight or Too Loose? Adjust your tension as you go. Focus on even, gentle movements for smooth result.
Benefits of Dutch Braided Bangs
- Face Framing: Emphasizes cheekbones and eyes, instantly brightening your face.
- Practical: Keeps bangs out of the way during workouts, summer heat, or growing-out periods.
- Versatile: Suits all hair types and lengths; works with straight, wavy, or curly hair.
- Stylish: Adds texture and interest to everyday hairstyles with minimal effort or tools.
- Timeless: Braids never go out of style—blend with ponytails, buns, or let your hair down for endless looks.
When to Wear Dutch Braided Bangs
- Everyday styling—at school, work, or running errands
- Sporty days—keep bangs secure during exercise
- Special occasions—subtle yet elevated look for weddings, parties, or date nights
- Growing out bangs—manage uneven lengths seamlessly
Creative Variations and Styling Ideas
Once you’ve mastered the basics of Dutch braided bangs, try experimenting with these creative styles:
- Double Dutch Braided Bangs: Split the bang section into two parts and Dutch braid each, pinning both back for extra intricacy.
- Sideswept Braided Bangs: Angle your braid diagonally across the forehead for a romantic, sweeping effect .
- Incorporate Into Updos or Ponytails: Dutch braided bangs blend beautifully into messy buns or sleek ponytails for a polished or effortless vibe.
- Accent Braids: Sprinkle in smaller Dutch braids among loose waves or curls for texture and dimension.
- Waterfall Dutch Braided Bangs: Alter the technique to allow some strands to fall through, mimicking the “waterfall braid” style with an inverted touch .
Table: Dutch Braid vs. French Braid
| Braid Type | Direction of Crossing | Appearance | Best For |
|---|---|---|---|
| Dutch Braid | Sections cross under the middle | Braid sits “on top” (raised effect) | Bold, dimensional styles |
| French Braid | Sections cross over the middle | Braid blends into hair (flat) | Subtle, classic looks |
Frequently Asked Questions (FAQs)
Q: Can I Dutch braid my bangs if they’re very short?
A: Yes, but it’s easier if your bangs are at least chin-length. For very short bangs, work with smaller sections and keep the braid tight. Use extra bobby pins or style gel to secure any flyaways.
Q: What products should I use for hold?
A: A lightweight, flexible-hold hairspray or a dab of pomade grips shorter bangs smoothly. For ultra-fine or clean hair, try texturizing spray or dry shampoo for extra grip.
Q: How do I keep the braid from unraveling, especially with slippery or layered hair?
A: Always secure the tail with a small elastic, and use crisscrossed bobby pins hidden under the braid. Smoothing down with hairspray after pancaking helps tame even the shortest layers.
Q: Can I braid my bangs with curly or textured hair?
A: Absolutely! Curly or wavy hair adds beautiful texture to Dutch braids. You may want to finger-comb before braiding, and use a little styling cream for smoothness.
Q: What’s the difference between a Dutch and a French braid?
A: The Dutch braid crosses sections under the center strand, so the braid stands out on top of your hair. The French braid crosses sections over the center, so it blends in and lays flat. The Dutch version is often called the “reverse French braid.”
Q: How can I make my Dutch braided bangs look fuller?
A: Gently pancake the finished braid by tugging the edges outward. Avoid pulling too hard if you have short or layered fringe—work slowly for the desired fullness without creating flyaways.
Q: Are Dutch braided bangs suitable for formal events?
A: Yes, Dutch braided bangs add subtle sophistication to updos, chignons, or half-up looks—perfect for weddings, parties, or any special occasion.
Final Thoughts: Why You Should Try Dutch Braided Bangs
Mastering the Dutch braided bangs technique instantly broadens your hairstyling possibilities. It’s a skill that’s practical for busy mornings, flexible for any hair length or texture, and stylish enough to turn heads. With a bit of practice, you’ll create polished, professional-looking braids that keep your bangs in place and elevate your everyday look. Whether blending into a messy bun, securing your fringe for the gym, or accessorizing for a formal event, Dutch braided bangs are a timeless, creative solution anyone can learn to master. Happy braiding!
References
- https://www.luxyhair.com/blogs/hair-blog/how-to-do-a-dutch-braid-hair-tutorial-for-beginners
- https://abeautifulmess.com/dutch-braided-bangs/
- https://www.youtube.com/watch?v=mtC6sMbgLO0
- https://www.youtube.com/watch?v=J8kWJC23QWk
- https://www.youtube.com/watch?v=eQIhTHm9SPY
- http://www.frmheadtotoe.com/2011/01/dutch-braided-bangs-tutorial.html
- https://www.youtube.com/watch?v=G7v-ny5Nkgk
- https://www.youtube.com/playlist?list=PLKr1OU5EnX8bcF03lnKPBBHE8BwYVFB1R


