DIY Outdoor Curtains: Transform Your Pergola or Patio with Custom Panels
Learn step-by-step how to craft durable, stylish outdoor curtains for pergolas and patios and enhance your outdoor oasis.

DIY Outdoor Curtains: Elevate Your Outdoor Living Space
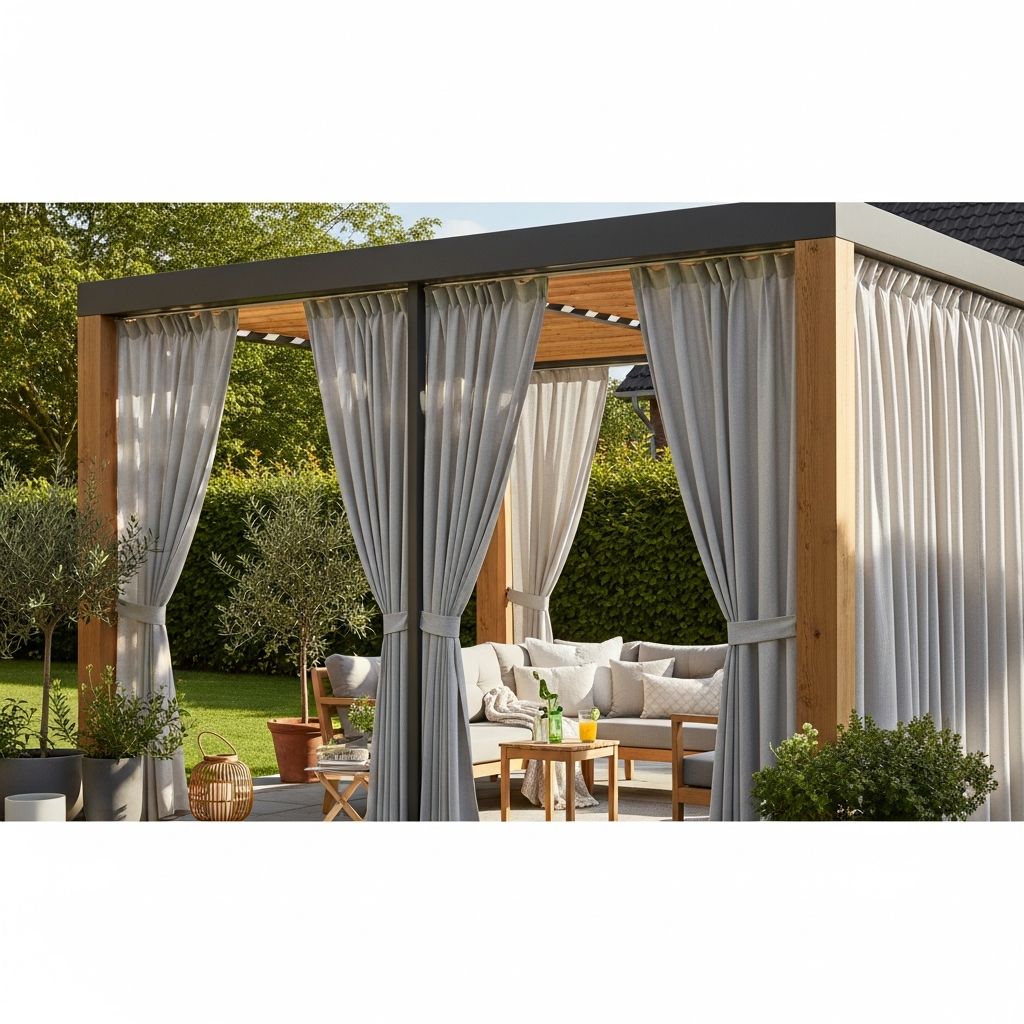
Outdoor curtains are a versatile and stylish way to add comfort, privacy, and a touch of luxury to your pergola, patio, or gazebo. Whether you’re looking to create a cozy retreat for summer evenings or need a way to shield your outdoor space from harsh sunlight and wind, making your own custom curtains allows you to control the look, durability, and budget for your project. In this guide, you’ll learn the complete process for making professional-quality outdoor curtains—from selecting fabric and hardware to installation and finishing touches.
Why Make Your Own Outdoor Curtains?
- Customization: Choose colors, patterns, and fabric weights to match your design vision.
- Better Fit: Tailor curtain dimensions precisely for your unique structure.
- Cost Savings: DIY panels can be significantly less expensive than ready-made options.
- Durability: Select weather-resistant materials and finishes appropriate for your climate.
- Personal Satisfaction: Enjoy the accomplishment of creating something beautiful and functional for your home.
Planning Your Outdoor Curtain Project
A successful DIY curtain project begins with meticulous planning. Before shopping for materials or starting any cutting, consider the following key factors:
- Structure Type: Pergola, patio, gazebo, covered porch, or other areas.
- Weather Conditions: Wind exposure, rain, sun intensity, and humidity affect fabric choice.
- Desired Look: Sheer for a breezy feel, canvas for privacy, bright colors, or neutral earth tones.
- Functionality: Fixed panels, movable curtains, roll-up shades, or curtained corners.
Essential Tools & Materials
- Weather-resistant outdoor fabric (canvas, polyester, or specialty outdoor textiles)
- Drapery weights or galvanized washers for hems
- Grommet kit and grommets
- Measuring tape
- Fabric scissors
- Sewing pins and machine (or heavy-duty needle and thread for hand-sewing)
- Iron
- Safety cup hooks for mounting
- Chain for securing panels (optional)
- Waterproofing spray
- Pencil for marking measurements
- Power drill and drill bits
Step 1: Measuring and Cutting Your Fabric
Start by measuring the height from the ground up to the point on the pergola or patio where you will attach the curtain. Double-check each measurement, especially if your structure is uneven—as many pergola posts and patio covers are constructed with slight variances.
- Measure from the ground to the midpoint of the horizontal board you’ll hang the curtain from.
- If different corners have different heights, measure each one individually for a precise, tailored fit.
- Add 2 inches to the top and 2 inches to the bottom to allow room for hemming. (Total: add 4 inches to your measured height.)
- Choose a wide fabric bolt or multiple panels as needed. A 54” wide fabric gives ample coverage for most situations; cut side edges if required.
Once you finalize your length and width calculations:
- Cut each of your curtain panels to size. For a full, billowy effect, make sure you have enough width for gentle gathering—even if the panel isn’t always pulled closed.
Step 2: Hemming the Curtain Panels
Proper hems give your curtains a clean, finished look while also helping to prevent fraying and water infiltration. Here’s how to hem your panels:
- Fold the top and bottom edges of each panel over 1 inch, pin in place, and press flat with an iron.
- Fold the hems in again another 1 inch, pin, and press once more. This double-fold ensures a sturdy, neat finish.
- If desired, add drapery weights or galvanized washers into the bottom hem for added weight to minimize wind movement. (Lead weights work well since they don’t rust; otherwise, use coated metals for durability.)
- Sew the hem closed with your machine, or use heavy-duty thread and a sharp needle for hand-sewing. Keep stitches straight for a professional appearance.
- For side edges, use a serger to create a rolled hem, or repeat the hem process with folds of 1/2 inch to reduce bulk.
Step 3: Adding Grommets to the Curtain Tops
Grommets make it easy to hang your curtains and slide them as needed. To install:
- Plan how many grommets you’ll need, typically one at each end and evenly spaced ones across the top. (For example, five per panel with approximately 13” between each, depending on width.)
- Mark the position of each grommet using a pencil for precision.
- Cut a small “x” in the fabric at each location, following your grommet kit instructions.
- Press the grommet pieces together as directed, securing them through the fabric for a snug, weatherproof fit.
Step 4: Hanging Your Curtains
With grommets installed, you’re ready to hang your curtain panels. Here’s how to achieve a stable, attractive setup:
- Decide how far out from each post you want the curtain to extend. For a cozy effect that still leaves the view intact, consider around 35” from the pole.
- Measure and mark evenly spaced points for each cup hook (one per grommet), typically five per panel.
- Pre-drill pilot holes using a drill bit slightly smaller than your cup hook’s screw end.
- Screw in the cup hooks at all marked positions—including around each corner or along every side you wish to curtain. (For four corners with five hooks each, this totals 40 hooks.)
- Hang the curtains by placing each grommet over a hook.
Optionally, secure the curtains further with short chains looped between the hooks and fabric for a more taut installation in windy areas.
Step 5: Finishing Touches and Waterproofing
For the best weather resistance, spray both sides of each panel thoroughly with outdoor fabric waterproofing spray. Allow to dry completely before use. This extra step preserves color, prevents mildew, and adds years of durability—especially in humid or rainy climates.
Creative Tiebacks for Outdoor Curtains
To keep your curtains pulled aside stylishly, DIY tiebacks are a simple and attractive solution:
- Mark the halfway point on your structure’s posts.
- Attach hooks or eye screws at these marks (on the post faces that meet the curtain panels).
- Use rope, braided fabric strips, weatherproof ribbon, or even sections of the same curtain fabric as tiebacks. Loop each tieback around the curtain panel and fasten to the hook.
- Experiment with decorative knots or add embellishments for extra flair.
Caring for Your Outdoor Curtains
- Regular cleaning: Shake off dust and debris; spot-clean dirt or mildew with mild soap and water.
- Seasonal waterproofing: Reapply waterproofing spray annually or as needed.
- Inspect hardware: Check hooks, cup hooks, and grommets for loosening or rusting and replace as needed.
- Store in winter: If you live in an area with heavy snow or ice, take curtains down in late fall, wash, dry, and store indoors to extend their lifespan.
Frequently Asked Questions (FAQs)
Q: What type of fabric is best for outdoor curtains?
A: Opt for outdoor-rated polyester, acrylic, or canvas. These fabrics resist sun-fading, repel water, and withstand mildew much better than standard indoor fabrics.
Q: How do I prevent my curtains from blowing in the wind?
A: Incorporate lead drapery weights or galvanized washers into the hem as described above. For extremely windy spots, consider securing curtain bottoms with ties or even installing anchor rings in the patio floor.
Q: Can I use shower curtains or regular drapes outdoors?
A: While shower curtains are sometimes used as a budget option, they rarely last as long or look as elegant as proper outdoor fabric. Regular drapes will degrade quickly in sun and rain.
Q: When should I take my outdoor curtains down?
A: If you live in a climate with harsh winter weather, remove panels in late autumn, clean, and store in a dry area until spring.
Q: How do I keep outdoor curtains looking bright?
A: Choose fade-resistant fabrics, clean regularly, keep panels dry when possible, and retreat annually with UV-protectant and waterproofing sprays to keep colors vibrant.
Inspiration: Personalize Your Outdoor Curtains
Once you master the basics, get creative! Here are ways to make your outdoor curtains uniquely yours:
- Painted Stripes: Use outdoor-grade fabric paint to add stripes, stencils, or geometric designs before hemming.
- Layered Look: Hang sheer panels behind solid ones for depth and more versatile privacy/light control.
- Decorative Tiebacks: Invest in decorative hooks, macramé ties, or nautical rope for a signature finish.
- Integrated Lighting: String outdoor LED fairy lights along the top or through transparent panels for magical summer evenings.
- Coordinated Cushions: Use leftover fabric to sew matching outdoor pillow covers for a coordinated look.
Troubleshooting Common Issues
- Sagging Panels: If fabric sags over time, re-tighten cup hooks, or consider adding more hooks to support the weight evenly.
- Rust Stains: Choose stainless steel or coated hardware to avoid rust marks on fabric. Replace any rusty hooks promptly.
- Mold or Mildew: Wash fabric with a mildew remover, let dry in sun, and increase airflow behind panels to reduce future growth.
- Fraying: Always double-fold and sew hems securely, and treat raw edges with fray-check if needed.
Summary Table: Key Steps for DIY Outdoor Curtains
| Step | Description |
|---|---|
| Measure Fabric | Measure height and width, adding extra inches for hems. |
| Cut Panels | Cut fabric to required dimensions for each curtain panel. |
| Hem Edges | Double-fold and sew top, bottom, and sides for a finished edge. |
| Insert Weights | Add weights or washers in lower hems to prevent blowing. |
| Add Grommets | Mark, cut, and install grommets across the top of each panel. |
| Hang Curtains | Install cup hooks, hang panels, and arrange as desired. |
| Apply Waterproofing | Spray panels front and back, let them dry before using outdoors. |
| Make Tiebacks | Add rope, fabric, or ribbon tiebacks for both style and function. |
Final Thoughts
With thoughtful material selection, simple sewing skills, and the right hardware, you can create stunning, practical outdoor curtains that elevate any exterior living space. Experiment with fabrics, colors, and arrangements to make your pergola, patio, or backyard a true personal sanctuary. From blocking the afternoon sun to adding a touch of privacy for an evening with friends, homemade outdoor curtains offer style and value that’s hard to beat.


