3 Creative Techniques to Add Lettering to Sugar Cookies
Master professional cookie lettering with three versatile techniques and expert tips to transform your sugar cookies.

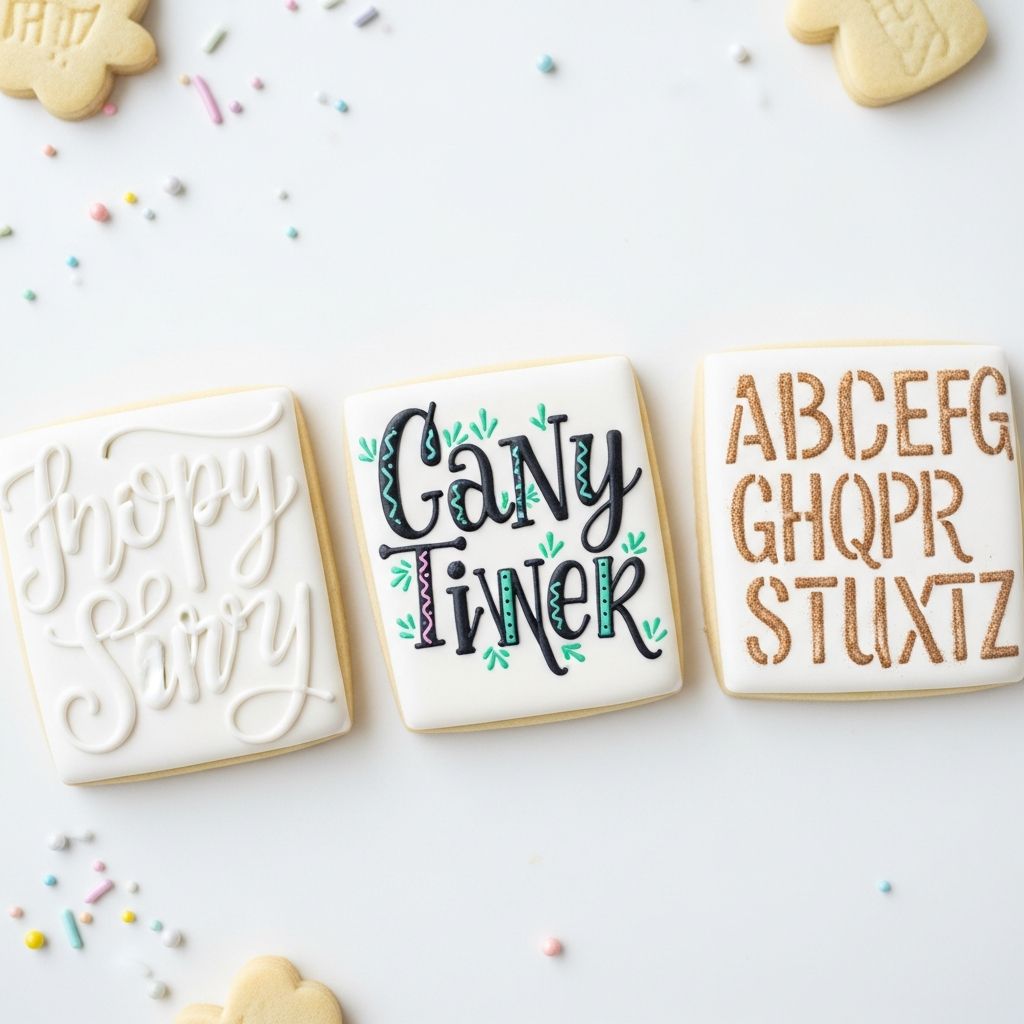
Lettering on sugar cookies gives your baked creations a personal touch, perfect for events, gifts, and celebrations. Whether you want to spell out a quote, a name, or a memorable date on your cookies, mastering this decorative skill can seem intimidating—especially if you lack confidence in your handwriting. However, with three professional techniques, you can easily achieve elegant and stylish results, even if you are a decorating beginner. This guide explores three reliable methods: wax paper transfers, tissue paper tracing, and projector tracing, using royal icing as your base medium. We’ll cover the tools required, step-by-step instructions, advantages and challenges of each technique, troubleshooting, FAQs, and expert tips to help you create picture-perfect lettered cookies every time.
Preparing for Lettering: Royal Icing Consistency and Basic Tools
Before you begin, ensure you have a batch of sugar cookies (your favorite recipe works) and prepare royal icing at the right consistency. For effective lettering:
- Use stiff royal icing—straight from the mixer with a touch of water.
- The ideal texture is similar to toothpaste: thick enough to hold shape but smooth enough to pipe fine lines.
- Basic tools include piping bags, a fine piping tip, edible markers (for tracing), wax paper, tissue paper, and optionally, a cookie projector.
With these essentials in place, let’s explore the three creative techniques for adding lettering to sugar cookies.
Method #1: Wax Paper Transfer Technique
This method uses wax paper as a surface to pipe your letters separately. Once dry, you’ll transfer the letters to your cookies using a dab of royal icing as glue. It’s a forgiving approach, ideal for those who feel less confident piping freehand directly onto cookies.
Instructions:
- Print Your Design: Create or print a sheet with the words or characters you want to put on your cookies. Make sure the font and size will fit nicely.
- Layer Wax Paper: Lay a clean sheet of wax paper over your printed design.
- Pipe Letters: Fill a piping bag with stiff royal icing. Carefully pipe the letters directly onto the wax paper, following the design underneath.
- Drying: Leave the piped letters undisturbed until completely dry. This can take several hours or overnight, depending on icing thickness and room humidity.
- Make Extras: Pipe a few extra sets of letters as backups in case any break during handling.
- Transfer to Cookies: Gently peel each letter off the wax paper. Attach them to your cookie surface using a tiny dab of royal icing.
Advantages:
- Allows for meticulous design and correction (simply pipe again if a letter breaks).
- Ideal for beginners worried about unsteady hands or imperfect lines.
- Letters can be repositioned easily before securing them onto cookies.
Tips for Success:
- Let Letters Dry Completely: Rushing the drying process may cause letters to stick, smudge, or break.
- Use a Fine Piping Tip: For crisp, legible lines, opt for a tip rated 1-2 (extra-fine).
- Clean Hands & Tools: Oil or crumbs on your hands can disrupt the smoothness or adhesion of the icing letters.
Method #2: Tissue Paper Transfer with Edible Marker
Tissue paper transferring bridges the gap between freehand piping and wax paper transfers. Here, you trace your lettering onto a thin sheet of tissue paper and use an edible ink marker to transfer the design onto a dry cookie.
Instructions:
- Cut Tissue to Shape: Trim a piece of tissue paper to match the size and shape of your cookie.
- Trace Design: Place tissue over a printout of your desired text. Using a fine point edible marker, carefully trace the lettering onto the tissue paper.
- Transfer to Cookie: Lay the traced tissue paper onto a fully dried, iced cookie. Lightly retrace over the tissue with a fresh edible marker or extra-fine edible pen, allowing the ink to transfer a thin outline onto the cookie.
- Pipe Over Guidelines: Using your piping bag and stiff royal icing, pipe carefully over the marker lines to form the text.
Advantages:
- Offers guidance for those nervous about freehand piping.
- Great for delicate or intricate fonts that are difficult to eyeball.
- Produces consistent lettering across multiple cookies.
Tips for Success:
- Use Edible Ink Only: Non-edible markers can leave toxins or taste residues. Choose food-safe pens.
- Let Cookie Surface Dry: Wet icing will smear or bleed the marker outlines.
- Trace Lightly: Heavy pressure can tear tissue paper or dent the cookie surface.
Method #3: Projector Lettering Technique
The projector method is favored by professionals for its accuracy and speed, especially for repeated designs. While it requires a small investment in equipment, it greatly streamlines cookie lettering for business, events, or large batches.
Instructions:
- Project Design: Use a mini or pico projector to display your desired lettering directly onto the iced cookie.
- Pipe Directly: Pipe over the projected image using a piping bag with stiff royal icing. Follow the illuminated guide for precise replication.
Advantages:
- Fast and accurate—ideal for batch decorating or complex designs.
- Enables perfect replication of fonts, logos, or artwork.
- Minimal risk of error during piping, as the template is visible on every cookie.
Tips for Success:
- Stabilize Cookie Position: Ensure cookies don’t shift during piping to avoid misalignment.
- Adjust Projector Focus: For sharp lines, check that the image is clear and sized correctly.
- Practice With Projector: Try tracing onto parchment first to get comfortable before working on cookies.
General Troubleshooting and Practice Advice
Regardless of the method you choose, the following advice will help ensure professional results:
- Practice Before Piping Onto Cookies: Always try out your design or lettering on parchment or wax paper first. This helps you adapt to the icing consistency and the piping motion.
- Work One Letter at a Time: For small fonts, complete each letter individually to avoid flooding or cratering.
- Piping Pressure: Too much pressure leads to smearing or uneven letters; practice steady slow squeezes.
- Clean Tools Between Uses: Rinsing tips and bags between sessions prevents hardening or clogging.
Table: Comparing Lettering Techniques for Sugar Cookies
| Technique | Skill Level | Equipment Needed | Accuracy | Best For |
|---|---|---|---|---|
| Wax Paper Transfer | Beginner | Wax paper, printouts, piping bag | High | Names, quotes, short text |
| Tissue Paper Transfer | Intermediate | Tissue paper, edible marker, printouts, piping bag | Moderate | Intricate fonts, designs |
| Projector Lettering | Advanced | Projector, piping bag, digital designs | Very High | Professional, large batches |
Expert Tips for Decorating Success
- Royal Icing Consistency: Use a toothpaste-thick texture for lettering. Thin icing will spread and blur letters; thick icing creates crisp edges.
- Font Selection: Choose simple block or script fonts for better control when piping. Intricate fonts may require projector or tissue transfer for best results.
- Use Templates: Printed guides or stencils boost consistency, especially for events with multiple cookies.
- Allow Adequate Drying Time: Rushed transfers or piping can lead to smears, cracks, or unwanted adhesion.
Frequently Asked Questions (FAQs)
Q: What is the best royal icing consistency for cookie lettering?
A: For clean lines and precise text, a stiff royal icing (similar to toothpaste) is preferred. If the mixture is too runny, letters may spread or lose definition.
Q: Can I use food coloring instead of an edible marker for tracing?
A: It’s safest to use edible markers, as food coloring does not have the same control or consistency needed for thin outlines. Edible markers ensure food safety and precise tracing.
Q: Which of the three methods is best for beginners?
A: Wax paper transfer is recommended for beginners due to its forgiving process and the ability to create multiple letter sets before transferring.
Q: How do I fix broken or cracked icing letters?
A: Pipe extras when using the wax paper method. For minor cracks, a tiny dab of royal icing can act as glue to repair the pieces directly on the cookie.
Q: Can I use the projector method without purchasing expensive equipment?
A: Yes. Small, affordable pico projectors are available online. Alternatively, freehand or stencil techniques are excellent, cost-free alternatives for most home bakers.
Q: How do I avoid smudging or bleeding when piping over marker lines?
A: Ensure the cookie surface is fully dry before tracing and piping. Avoid using excessive pressure when piping over the marker.
Beyond Lettering: Tips for Adding Other Designs
These methods are not limited to text. You can also use wax paper transfers, tissue tracing, or projectors to add silhouette shapes, icons, and simple artwork to cookies. Just adjust your template accordingly, and follow the same general process for clean, sharp results.
Conclusion: Create Your Own Lettered Cookie Masterpieces
With these three versatile lettering techniques, any home baker can achieve polished, professional-looking decorated cookies. Start with the method that suits your skill level, experiment with fonts and colors, and enjoy sharing beautifully personalized cookies at all your special occasions.
- Wax paper transfers offer security and let you perfect each character before adhesing.
- Tissue paper tracing gives guidance while allowing flexibility for fonts and shapes.
- Projector tracing is ideal for business-level efficiency and absolute accuracy.
Practice, patience, and quality ingredients will help you turn your cookies into edible works of art. Happy decorating!
References
- https://abeautifulmess.com/3-ways-to-add-lettering-to-sugar-cookies/
- https://www.youtube.com/watch?v=gfmuTpXJx-I
- https://abeautifulmess.com/3-ways-to-add-texture-to-cookies/
- https://www.youtube.com/watch?v=otpOZP7o23w
- https://abeautifulmess.com/aunt-judys-sugar-cookies-with-royal-icing/
- https://abeautifulmess.com/what-you-need-to-decorate-sugar-cookies/


