How to Cook Scallops on the Stovetop
Master the art of cooking perfect scallops at home with this complete stovetop guide
How to Cook Scallops on the Stovetop: Cooking Lessons from the Kitchn
Scallops are one of the most elegant proteins you can cook at home, yet many home cooks avoid them because they seem intimidating or complicated. The truth is, cooking scallops on the stovetop is actually one of the simplest and most straightforward cooking methods available. With just a few key techniques and a little bit of attention to detail, you can create restaurant-quality seared scallops right in your own kitchen. Whether you’re preparing a special dinner for guests or treating yourself to something special, stovetop scallops are the perfect solution for an impressive meal that takes less than ten minutes to prepare.
Why Cook Scallops on the Stovetop?
The stovetop is arguably the best method for cooking scallops, and here’s why. Pan-searing scallops on the stovetop creates a beautiful golden crust on the outside while keeping the inside tender, buttery, and succulent. This method is faster than oven-roasting, more controlled than grilling, and produces consistently excellent results. The high heat of the stovetop allows the exterior of the scallop to caramelize quickly through the Maillard reaction, creating depth of flavor that other cooking methods simply cannot achieve. Additionally, stovetop cooking gives you direct control over the cooking process, allowing you to monitor doneness and adjust heat as needed.
Selecting the Right Scallops
Before you even get to the cooking stage, selecting the right scallops is crucial. There are two main types of scallops available: bay scallops and sea scallops. Sea scallops are larger and have a meatier texture, making them ideal for pan-searing on the stovetop. Bay scallops are smaller, sweeter, and more tender, making them better suited for pasta dishes or quick sautés. For the purposes of stovetop searing, sea scallops are your best choice. When shopping for scallops, look for ones labeled as “dry” rather than “wet.” Wet scallops have been treated with sodium tripolyphosphate, which helps them retain moisture but prevents proper browning. Dry scallops will sear much better and develop that coveted golden crust.
Essential Equipment for Stovetop Scallop Cooking
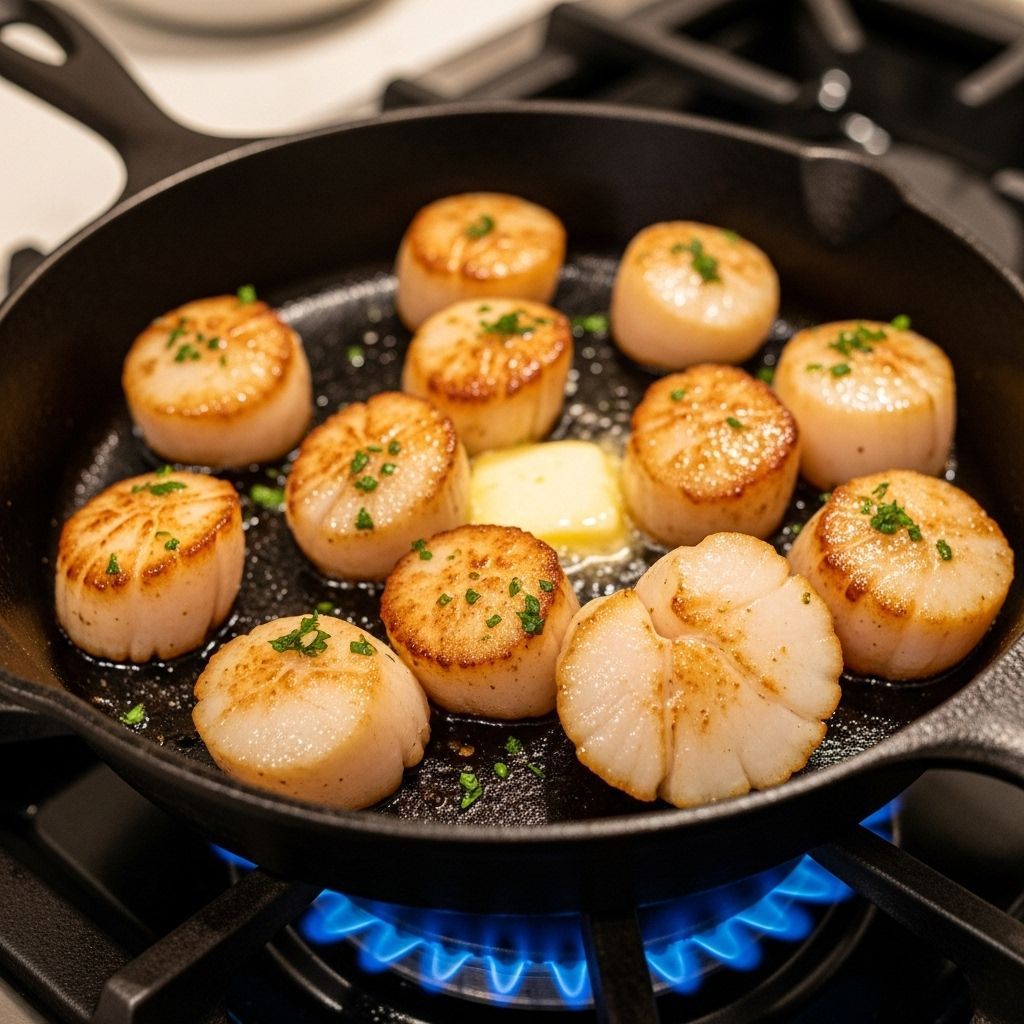
Having the right equipment makes a significant difference when cooking scallops on the stovetop. The most important piece of equipment is a good quality skillet. A cast-iron skillet is ideal because it retains heat exceptionally well and heats evenly, resulting in a beautiful, consistent golden-brown sear. The sturdy metal construction of cast iron conducts heat efficiently, which is essential for achieving that restaurant-quality crust. While some recipes call for non-stick skillets, these are actually not recommended for searing scallops. Non-stick pans are made of flimsier metals that conduct heat less efficiently, which means you won’t achieve the same level of browning and caramelization.
In addition to a good skillet, you’ll need paper towels for drying the scallops, a high-heat oil for cooking, butter for finishing, and a spoon for basting. Having these items on hand and prepared before you start cooking will make the process smooth and efficient.
Preparing Your Scallops for Cooking
Removing the Side Muscle
Before cooking, scallops often have a small, tough side muscle that needs to be removed. This muscle is chewy and unpleasant to eat, so it’s important to remove it before cooking. The good news is that this muscle is easy to remove and can be done by hand. Simply locate the small muscle on the side of each scallop and gently pull it away. Once it’s removed, you’re ready to proceed with preparation.
Drying the Scallops Thoroughly
One of the most critical steps in preparing scallops for stovetop cooking is drying them thoroughly with paper towels. This step cannot be overstated in its importance. Moisture is the enemy of browning, and wet scallops will never develop that beautiful golden crust. Use high-quality paper towels and pat each scallop dry on both sides, pressing gently to remove all surface moisture. Don’t rush this step—the drier your scallops, the better your results will be.
Seasoning at the Right Time
Once your scallops are dry, season them with salt and pepper. However, timing matters here. Season the scallops right before cooking, not several minutes in advance. Seasoning too early will draw out moisture from the scallops and create a wet surface, which defeats the purpose of all that drying work. A good rule of thumb is to season one side of the scallops just before they go into the pan, then season the other side while they’re cooking.
The Stovetop Cooking Process
Heating Your Pan and Oil
Heat your cast-iron skillet over medium-high to high heat until it’s very hot. You want the pan to be hot enough that when you add oil, it shimmers immediately. Add a high-heat oil such as vegetable oil, canola oil, or refined avocado oil to the hot pan. The oil should be hot enough that it’s very fluid and shimmers, but not so hot that it’s smoking. This is the perfect temperature—not too cool that the scallops steam, and not so hot that the oil burns.
Arranging the Scallops in the Pan
Once your oil is at the correct temperature, carefully place your scallops in the pan, spacing them so they’re not touching each other. Crowding the pan is one of the biggest mistakes people make when cooking scallops. When scallops are touching, they steam each other instead of searing, and you won’t get that beautiful golden crust. If you have more scallops than can fit comfortably in your pan with space between them, cook them in batches. It’s worth taking the extra time to do it right.
The Searing Phase
Here’s where patience becomes your best friend. Once the scallops hit the hot oil, resist the urge to touch them or move them around. Leave them completely undisturbed for approximately two minutes. During this time, the scallops will develop a golden, caramelized crust on the bottom. The secret to preventing sticking is simply patience and trust. When the scallops have properly seared and browned, they will naturally release from the pan. If you try to move them before they’re ready, they’ll stick and tear. Wait until they release easily on their own.
Flipping and Finishing
After about two minutes, when the scallops have developed a beautiful golden crust on the bottom, flip them gently. At this point, reduce the heat to medium-high. Add a tablespoon or two of butter to the pan. Tilt the pan slightly and use a spoon to baste the scallops with the melted butter for about 30 seconds to 1 minute, depending on their size. This butter-basting step adds incredible flavor and ensures even cooking. The scallops are done when they look mostly opaque throughout and feel firm with a little bit of bounce when you touch them.
Checking for Doneness
Knowing when your scallops are perfectly cooked is essential. Scallops cook very quickly, usually in less than five minutes total, so it’s important to pay close attention. The most reliable way to check for doneness is the touch test. Gently press a scallop with your finger—it should feel firm with a little bit of bounce, similar to the fleshy part of your palm between your thumb and index finger when your hand is relaxed. If it feels soft and mushy, it needs more time. If it feels hard, you’ve overcooked it.
Another indicator of doneness is appearance. Done scallops should look mostly opaque throughout, though many chefs prefer them with just a tiny bit of translucence in the very center. This is a matter of personal preference, but err on the side of undercooking rather than overcooking. Remember that scallops will continue to cook a bit as they rest after you remove them from the heat, so it’s better to remove them slightly underdone than to risk overcooking them.
Common Mistakes to Avoid
Overcrowding the Pan
Perhaps the most common mistake is crowding too many scallops into the pan at once. This causes them to steam rather than sear, preventing browning and resulting in rubbery texture.
Not Drying the Scallops Enough
Moisture prevents browning, so insufficient drying will result in pale, steamed scallops rather than beautifully seared ones.
Disturbing the Scallops While Searing
Constantly poking, prodding, or trying to flip scallops before they’re ready to release will cause them to stick and tear.
Using the Wrong Type of Pan
Non-stick pans don’t conduct heat as efficiently as cast iron, making it difficult to achieve proper browning.
Overcooking
Scallops cook very quickly and become rubbery when overcooked. It’s better to undercook slightly than to overdo them.
Serving Your Stovetop Scallops
Once your scallops are perfectly seared, remove them from the pan immediately and serve right away. Scallops are best enjoyed fresh and hot, so timing is important. You can serve them simply with just a squeeze of fresh lemon juice, or you can elevate them further with a sauce. A classic pairing is a garlic butter sauce made by adding minced garlic, butter, fresh lemon juice, and a splash of white wine to the same pan you used for cooking the scallops. Scrape up any browned bits from the bottom of the pan and cook until fragrant and slightly reduced. Pour this sauce over your scallops and garnish with fresh parsley for an elegant presentation.
Side Dishes That Pair Well with Seared Scallops
Seared scallops pair beautifully with a variety of side dishes. Light sides work best to let the delicate scallop flavor shine. Consider serving your scallops with buttered pasta, creamy risotto, roasted asparagus, or a fresh green salad. French green beans make an elegant accompaniment, as do roasted vegetables like zucchini, bell peppers, or cherry tomatoes. For something heartier, creamy mashed potatoes or coconut rice complement scallops wonderfully. A crusty piece of artisan bread is perfect for soaking up any pan sauces.
Frequently Asked Questions
Q: Can I cook scallops in a regular stainless steel skillet instead of cast iron?
A: Yes, you can use a stainless steel skillet, though cast iron is preferred because it retains heat more effectively. Stainless steel skillets work fine as long as they’re heavy-bottomed and heat well.
Q: How long can I store leftover cooked scallops?
A: Cooked scallops can be stored in an airtight container in the refrigerator for up to two days. Reheat gently in a low oven or on the stovetop to avoid overcooking them further.
Q: What’s the difference between dry and wet scallops?
A: Wet scallops have been treated with sodium tripolyphosphate, which helps them retain water. This prevents them from browning properly. Dry scallops are untreated and will sear much better.
Q: Can I use bay scallops instead of sea scallops for stovetop searing?
A: While you technically can, bay scallops are much smaller and more delicate. They cook even more quickly than sea scallops and can become rubbery easily. They’re better suited for pasta dishes or other applications.
Q: How can I prevent my scallops from sticking to the pan?
A: The key to preventing sticking is patience. Make sure the pan and oil are very hot, and don’t disturb the scallops until they’ve developed a golden crust and naturally release from the pan. Trust the process.
Q: What oil should I use for cooking scallops?
A: Use a high-heat oil such as vegetable oil, canola oil, refined avocado oil, or refined coconut oil. Avoid extra virgin olive oil, which has a lower smoke point and will burn at the high temperatures needed for searing.
Q: Can I make scallops ahead of time and reheat them?
A: It’s best to cook scallops fresh and eat them immediately for the best texture. However, if you must make them ahead, store them in the refrigerator and reheat gently in a 300-degree oven for a few minutes. Don’t use the stovetop, as it can cause them to overcook further.
Conclusion
Cooking scallops on the stovetop is one of the most rewarding culinary techniques you can master. With the right equipment, proper preparation, and a bit of patience, you’ll be able to create restaurant-quality scallops at home every single time. Remember the key principles: use dry, high-quality sea scallops; dry them thoroughly; get your pan and oil very hot; don’t overcrowd the pan; and leave them undisturbed while they sear. Follow these guidelines, and you’ll have perfectly cooked scallops with a beautiful golden crust and tender, buttery interiors. Once you’ve mastered this basic technique, you’ll find yourself cooking scallops regularly, impressing family and friends with your culinary skills.

